This page highlights the crosses at Castledermot, in County Kildare. It includes an Introduction to the Site, and a description of the Crosses.
Introduction to the Site
The monestery at Castledermot was founded about 812 CE by Diarmait or St. Dermot, a grandson of Aed Ron, King of Ulster. It was originally known as Diseart Diarmada or Dermot's Hermitage. The date of its founding was late for the Irish hermitage tradition (typically 400-700 CE). It was also distinctive in that it was founded in an area that seemed to be quite well settled in the 9th century, where most hermitage style monasteries were founded in more remote areas. It is not known why Diarmait moved south into Leinster to form his monastery. It may have been influenced by the fact that the area had an association with Palladius, the first Roman bishop in Ireland.
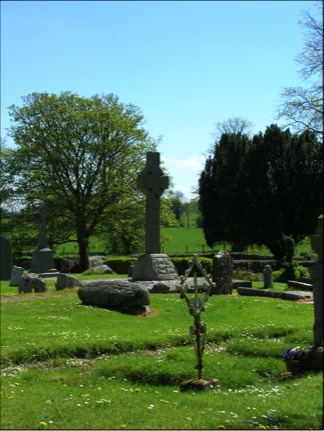
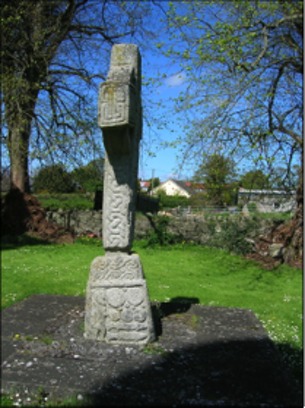
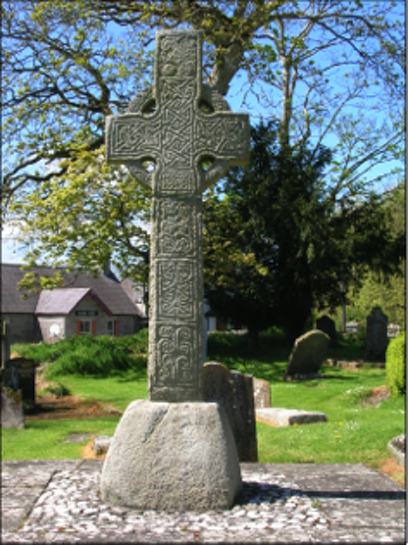
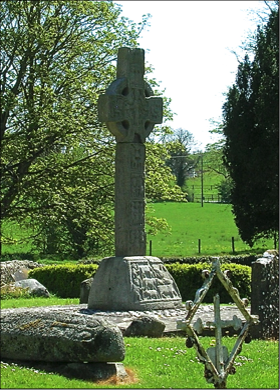
The photo to the right shows the cemetery with the South cross in the center.
Diarmait was a proponent of the Ceile De or Culdee movement. The Culdees were a reaction against the materialism and political involvement of many of the well established and by then wealthy foundations. They sought a return to greater piety in their common life.
Diseart Diarmada is mentioned frequently in the Irish annals. These entries suggest that Diarmait's mission survived and often thrived for about 300 years (from 812 to 1106). In part their survival was due to the patronage of the O'Toole family. Their financial support is evident in the round tower and the two surviving high crosses at the site. This also suggests, however, that by the 10th century the foundation was willing to have and exhibit the signs of wealth that the round tower and high crosses represented.
During the time of the Viking troubles the community was attacked in 841 and 867. These attacks set back the progress and growth of the monastery.
In 1037 the foundation became embroiled in a political incident. Dunchadh, king of Leinster was blinded and subsequently killed there. In 1040 a rival clan plundered the site and took prisoners. In 1043 another tribal chief and his wife were killed there while presumably enjoying the hospitality and protection of the monks. During this time there was a power struggle in the area and the monastery was not exempt from the troubles of the world around it.
The final pre-Norman reference in the Annals tells of the destruction of Diseart Diarmada by fire. It is not known whether any rebuilding took place following the fire or if the community moved on. The annals become silent on Castledermot.

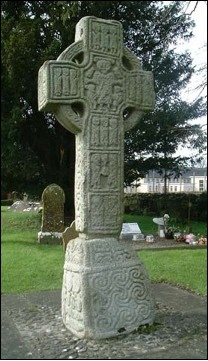
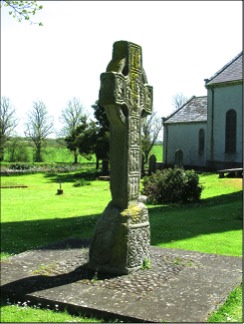
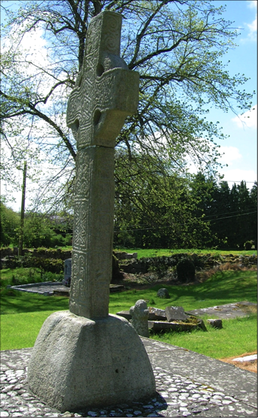
The history of the south cross is a bit mysterious. An estate map of Castledermot was commissioned by the Earl of Kildare and created in 1758 by John Rocque, a noted surveyor and cartographer. This map (see a small section to the left) shows the church yard. In the yard one cross is visible, the North Cross. (Harte and Richardson, p. 8 & figure 4) This suggests the south cross was not standing in the mid-eighteenth century. Peter Harbison supports this implication when he reports that three pieces of the cross were re-assembled in the 19th century under the direction of the Marquis of Kildare. (Harbison, 1992, 39) In the photo below it appears the three peices were the base, the shaft and the head.
Both the north cross, the south cross are made of granite. The cross stands about eight feet nine inches tall. It is a little over three feet wide across the arms. It sits atop a base that is just over two feet tall. There are a number of scenes on the south cross that duplicate images found on the north cross as will be noted below. The sketch of the history of Castledermot is taken from Eachtra Journal, Issue 7, August 2010. "Archaeological Excavation Report 04E0750 - Castledermot town, Co. Kildare", pp. 1-3 written by Aidan Harte and Aine Richardson.
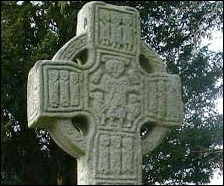
North Cross: The north cross (photo to the left) stands a little more than seven feet tall. Across the arms it measures just under five and a half feet. It sits on a base that is about three and a half feet tall, unusually tall for a High Cross base but not unheard of. The east and west faces of the cross are filled with figural art. On the east face these include the crucifixion of Jesus and a depiction of the 12 apostles around the crucifixion scene. The shaft has two additional panels that depict scenes from the desert fathers. These are post New Testament images. The west face is also filled with figural scenes. In this case, all of the images are derived from the Hebrew scriptures or Old Testament.
East Face:
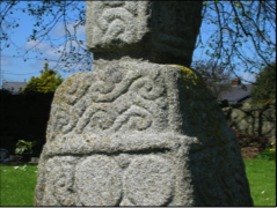
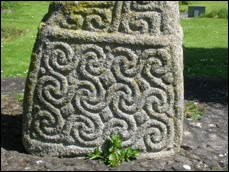
Geometric Design: The east face of the base has a lower and an upper panel,both are filled with geometric design. The predomanent design on the larger lower panel is that of s-curves. They are interlinked both horizontally and vertically. The upper panel is more difficult to see in the photos left and right. The pattern runs horizontally and is composed of c-curves. Each is set off in a separate frame.
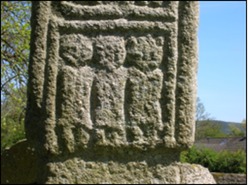
Two Robed Figures: Moving to the cross itself, the lower panel (below left) contains two long-robed figures facing the front. The figure on the left may be holding a staff across his body. These two have not been reliably identified, but Peter Harbison suggests that given the image above, they may represent St. Paul and St. Anthony of the desert. (Harbison, 1992, 37) Saints Paul and Anthony breaking bread. The central image on the east shaft of the cross shows two men facing each other. In between is a round object understood to be a loaf of bread. It is being carried to the men by a raven. This is definitely a scene reflecting a story of two of the great Desert Fathers.
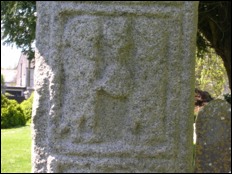
The story is that Saint Paul the Hermit was the first to live alone in the wilderness. For seventy years he lived in a cave, wore a tunic made from a palm tree fiber and saw no one. His meals were send to him by God via a raven. Each evening he received half a loaf of bread. When Saint Anthony, another of the early desert fathers, learned about Saint Paul, he immediately went to find him. When Anthony found him he was greeted with hospitality and the two talked about the greatness of God. In the evening the raven appeared. The bird carried not a half loaf of bread but a full loaf, half for each of the two saints. The story is intended to emphasize the holiness of both of the men. (CopticChurch.net, 1998-2005, http://www.copticchurch.net/synaxarium/6_2.html)
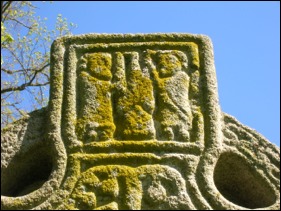
The Apostles: The highest image on the shaft could be considered as part of the head of the cross. Nearly half of it is inside the ring. As seen in the image below there are three figures on each side of the center of the head of the cross. These figures almost certainly represent the twelve apostles. The images are all simple and generic.
The Ring: Peter Harbison describes the designs in the ring as follows: "the ring is decoratedwith interlinking S-shaped spirals below left, a meander upper left and possibly interlace above right." (Harbison, 1992, 37) No mention is made of the lower right portion of the ring because it is too damaged to identify a pattern.
The Crucifixion: In the center of the head of the cross is a crucifixion scene. The usual characters of Stephaton, offering vinegar, and Longinus, with his lance are present below Christ's arms. Above his arms are the typical angels, facing toward Jesus head. Because of the space, Jesus' arms seem to be bent out at the elbows and he appears to have rather large shoulders. It is an ackward pose. Jesus is clothed in a long robe. The most peculiar feature in the scene is what sits atop Jesus' head. This could be intended to represent his hair, or as Peter Harbison adds, perhaps it is meant to be the crown of thorns. (Harbison, 1992, 37)
South Side:
As seen in the photo to the left, most of the decoration on the south face of the North cross is geometric design. The only figural representation is on the lower portion of the base of the cross.
The Base: In the lower panel we have a straightforward representation of the multiplication of the loaves and fish. The story is told in the Gospel of Matthew 15:32-38 and in the Gospel of Mark 8::1-10. In both texts the number of loaves is given as seven. In the image on the base (see photo below) there are two large loaves, three of a smaller size and five of what Peter Harbison describes as "buns". (Harbison, 1992, 37) So the image is suggestive rather than exact. In addition there are two fish that could be described as moderate to large in size. The text mentions several small fish. The figure of Jesus stands to the left reaching out to bless this food.
The upper portion of the base (see photo below) is filled with s-shaped design with lozenge-shapes filling the gaps. (Harbison, 1992, 37)
The shaft: The shaft of the cross (see photo below right) is decorated with a wide interlace.
The Ring: There is an undecorated panel on the underside of the ring.
End of Arm: The end of the arm (see photo left) has what Peter Harbison refers to as a meander pattern. The under side of the arm and the top of the cross are not decorated. (Harbison, 1992, 37)
West Face: Often the possible identification of a figural scene depends on its context. In the case of the west face of the north cross at Castledermot, context seems particularly important. On a number of the scripture crosses one side contains Hebrew scripture references and the other side Christian scripture references. The scenes on the east face of this cross deal with New Testament or Christian scripture scenes including an early church reference to Saints Paul and Anthony. It is possible to identify each of the scenes of the west face of the cross as Old Testament or Hebrew scripture references. Several of them clearly are. Therefore, when choosing between a Hebrew scripture and a Christian scripture identification on the west face of this cross, I will tend to select the Hebrew scripture reference. Further amplifying this the figures on the shaft of the cross, can each be identified as a story in the Daniel cycle, stories from the book of Daniel.
The Base: The west face of the base (see photo below) is similar to the east face. It is composed of s-shaped spirals all interconnected. The pattern is smaller than that of the east face having four full s-curves horizontally rather than the three on the east face. The upper panel of the base also follows the pattern of the east base. It is composed of c-shaped curves. While the base is not symmetrical in shape, it is clear that part of this design has been broken off.
The Shaft: Moving from the bottom of the shaft upward we have three images.
Three Children in the Fiery Furnace: Most authors agree that the lowest scene on the shaft (below left) represents the Three Children in the Fiery Furnace. This story is told in Daniel 3:19-30. Harbison lists a Christian scripture alternative as the Journey to Emmaus told in Luke 24:13-35. (Harbison 1992, 38) The image shows three figures facing forward.
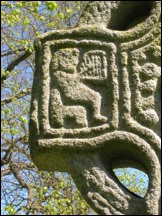
Susanna delivered from her tempters: Harbison and other authors tend to identify this scene (below center) as the temptation of Saint Anthony. I prefer an alternative, also mentioned by Harbison. (Harbison 1992, 38) The story of Susanna has at various times been part of the book of Daniel. In some instances it represented chapter 1 of Daniel, at other times it came after chapter 12. In the protestant world it is typically listed separately as one of the books of the Apocrypha. The story illustrates the virtue and faith of Susanna and the wisdom of a young Daniel. (Smith-Christopher, 174f) Harbison describes the scene as follows: "A central figure, shown frontally in a long robe and with its hands joined on its breast, is flanked by two creatures with human bodies and animal heads, and carrying a book." (Harbison, 1992, 38)
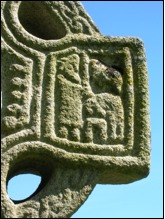
Daniel in the Lion's Den: The top most image on the west face of the cross (above right) depicts Daniel in the Lion's Den. The story is told in Daniel 6. Daniel faces forward and there are two lions on each side of him. They appear upright, one on top of the other.
The Head: There are four images on the head of the cross. Three of them are clearly Hebrew scripture references.
David Playing the Harp: This is an image (below left) frequently used to portray King David. As told in 1 Samuel 16:14-23 David often played the harp for King Saul.
Eve gives the apple to Adam: At the center of the head (below center) is an image of Adam and Eve. The tree rises in the center and its branches follow the frame outward and down. The figure on the right seems to be seated and may be Adam. The figure on the right has the serpent moving toward it and may represent Eve. The apple is being exchanged in the center. The story is told in Genesis chapter 3.
The Sacrifice of Isaac: Here (above right) Abraham stands to the right holding up a sword while Isaac leans over the altar. The ram that becomes the sacrifice in Isaac's place is above his back. The story is told in Genesis chapter 22.
The Judgment of Solomon: This image has been interpreted in many different ways: Saints Paul and Anthony overcoming the devil, the martyrdom of Saint Peter, the Death of Isaiah, the fall of Simon Magus, David delivered from Goliath and the slaughter of the Innocents. I tend to agree with Peter Harbison who writes, "In view of the other Old Testament scenes on the head of the cross, this panel is more likely to represent the Judgment of Soloman than the Slaughter of the Innocents, but the long garments jof the flanking figures could favour an interpretation as Saints Paul and Anthony overcoming the devil in human form." (Harbison, 1992, 38)
"A long-robed figure on the left holds up a sword or club, while a figure in a long robe and cloak on the right holds up the right leg of a third figure upside down between them." (Harbison, 1992, 38) The central figure is quite large for an infant. The story is told in 1 Kings 3:16-28. It illustrates the wisdom of Solomon as King of the Hebrew people.
North Face:
Like the South face, the north face is composed mostly of geometric design. On both faces this is true with the exception of the carving on the base.
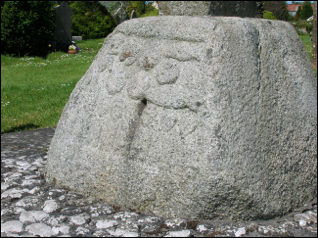
The Base: This unusual figure appears to be "seated on its haunches and placing the right hand half-way up[ the lower leg. As there would appear to be hatched wings on the back, the figure ought possibly to be indentified as an angel." (Harbison, 1992, 38)
This figure had evoked a wide variety of interpretations including pagan interment, the devil, a bird-headed being, deliverance from the captivity of sin and vanquished death. (Harbison, 1992, 38)
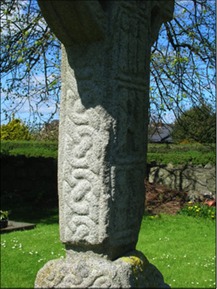
The Shaft: On the shaft of the cross (photo right) we see a pattern of s-shaped spirals.
The Head: "The underside of the ring has a sunken panel, as on the south side. The upper side of the ring and the top of the cross remain undecorated." On the end of the arm is a figure that ma be an angel. (Harbison, 1992, 38-39)
The South Cross
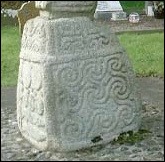
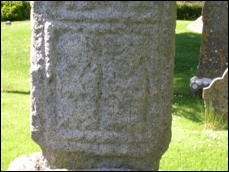
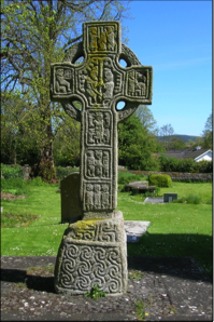
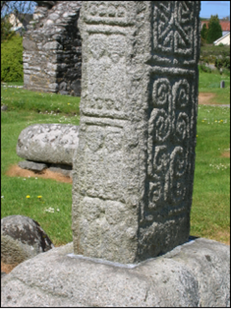
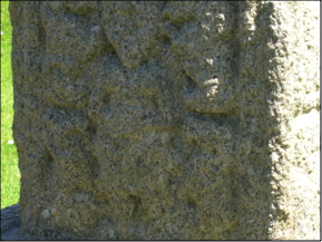
East Face: The Base on the east face of the cross has no decoration, as can be seen in the photo of the east face of the cross (below right).
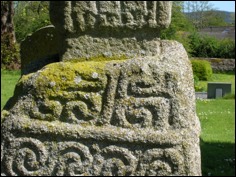
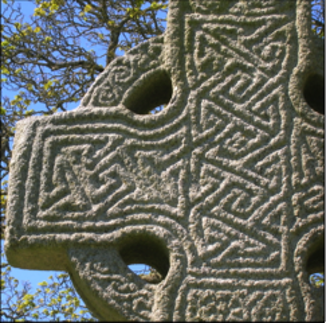
The Shaft and Head of the east face are completely covered by geometric design. The shaft has four panels. Moving up the shaft we have C-shaped spirals, a fretwork pattern, a panel of S-spirals and a small panel of interlace.
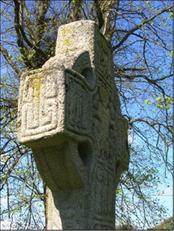
The head and arms are decorated with fret patterns. Those in the center of the head run vertically while those on the arms run horizontally.
The Top has a spiral in each corner. They arise from an undecorated central diamond shaped surface.
The Ring is decorated with S-spirals.
The features of the head, arms and ring are more clearly seen in the image below.
South Face:
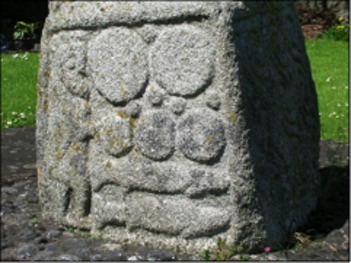
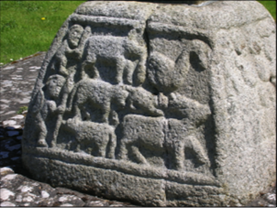
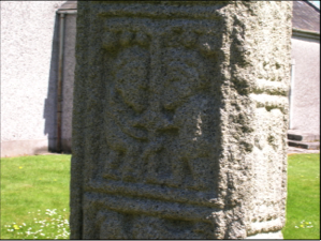
The Base is decorated with an image of the multiplication of the loaves and fishes. The story is told in the Gospel of Matthew 15:32-38 and in the Gospel of Mark 8::1-10. A similar image appears on the base of the north cross, the south face. Like that image Jesus is to the left reaching out to bless loaves and fish. In this case there are five loaves and two fish. An addition here is the presence of eight figures on the lower part of the scene. They probably represent those who had come out to hear Jesus teach and were in need of food.
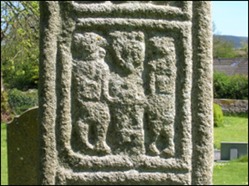
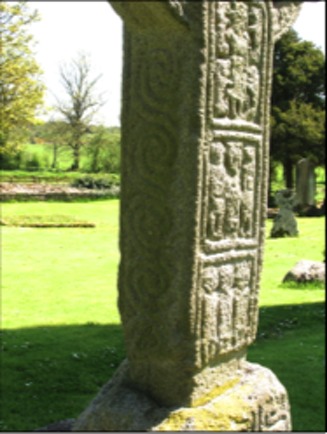
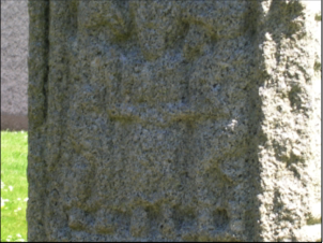
The Shaft has six panels (see below left and center). Each depicts two figures viewed frontally. Because the total number of figures is twelve, it is assumed they represent the Apostles. The Apostles also appear on the north cross. There the figures surround the head of the cross on the east face.

While not shown, the under side of the ring has a sunken panel and the end of the arm has a figure that has not been identified. The top (above right) has an S-Spiral pattern. (Harbison, 1992, p. 39)
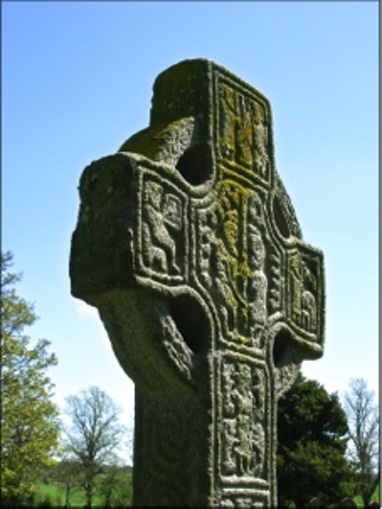
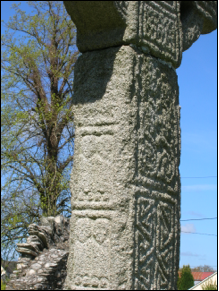
West Face: The west face of the cross (below left) contains an eclectic collection of scenes including images from the Hebrew Scriptures, the Christian scriptures and stories of the early desert fathers.
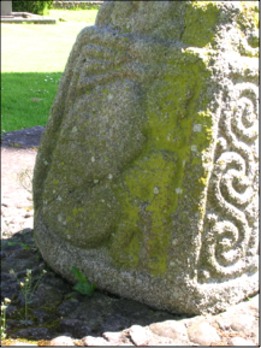
The scene on the base has been interpreted in two different ways. Many high cross scholars have interpreted the scene (below) as Noah herding the animals into the ark. This is part of the story of the great flood told in chapters 7-9 of the book of Genesis. The implication is that Noah and perhaps one of his sons are driving animals toward the ark just before the beginning of the flood. The challenge to this interpretation is that there are no pairs of animals and the herders are seen to carry weapons.
Peter Harbison suggests this is a depiction of a hunting scene. (Harbison, 1992, p. 39) There are similar scenes on two other high crosses: the Market cross and the South cross at Kells. In each case the image may be interpreted either as a hunt scene or as relating to Noah driving the animals into the ark. Thus comparison does not help to identify the intended content.
There are four other crosses that have images that reference the flood story. They are the Armagh Market cross, the Donaghmore cross in County Down, the West cross at Kells and the West cross at Killary. In each of these cases it is an image of the ark itself that is depicted.
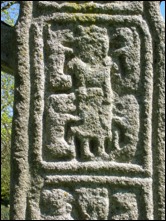
The Shaft of the cross contains four images as seen below. The lowest image (below left) depicts Daniel in the Lion's Den. While not sharp and clear Daniel can be seen in the center of the image with two lions depicted vertically on each side. We see almost exactly the same image on the west face of the North cross.
The next image (below right) has been interpreted by Peter Harbison and others to represent the temptation of Saint Anthony. Others have suggested it represents temptation (but not of Saint Anthony), the temptation of Suzanna, or the Arrest of Christ. (Harbison, 1992, p. 39) Again we have an almost exact image on the North cross. There I have interpreted it as representing the temptation of Suzanna. The story of Suzanna is told in the previous feature. The image almost certainly is intended to depict temptation because the two side figures have human bodies but animal heads. My interpretation would mean the lowest two images here both represent stories from the book of Daniel.
There is no doubt about the identification of the next panel (below left). It clearly depicts the story of Eve giving the apple to Adam. This image can also be found on the North cross. There it occupies the center of the head on the west face which allows for the branches and fruit of the tree to come down behind Adam and Eve. In both cases Eve is seen in the act of handing over the forbidden fruit.
The top image on the shaft of the cross (below right) clearly represents the story of Saints Paul and Anthony sharing bread in the desert. Once again this image is a duplication of a similar image on the North cross. The story is told in the previous feature.

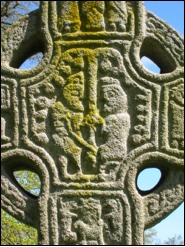
The Head of the cross has six separate images, two of which are difficult to clearly interpret.
Mocking or Flagellation of Christ is one interpretation of the scene at the top of the west face. While it is difficult to see clearly in the photo below, Peter Harbison describes it as follows: "A central figure, shown frontally, is flanked on each side by a figure in profile. Each of the flanking figures holds up a sword (or a club?). . . the wing-like side-appendages of the central figure being perhaps the scarlet or purple cloak which the soldiers put on Christ." Other interpretations suggest this image depicts Moses, Aaron and Hur, the Arrest of Saint Peter or the Massacre of the innocents. (Harbison, 1992, p. 40)
Unidentified is the way Peter Harbison describes the second panel down. There are three figures facing forward but the lack of attributes make it impossible to clearly identify. Of course suggestions have been made including the Journey to Emmaus, the Fiery Furnace and the Three Wise Men delivered from Herod. (Harbison, 1992, p. 40)
The left arm contains an image of David playing the harp. David sits with the harp on his lap. The right arm depicts the Sacrifice of Isaac. Abraham on the left carries a sword. Isaac bends over an alter at the lower right and the ram is pictured in the upper right.
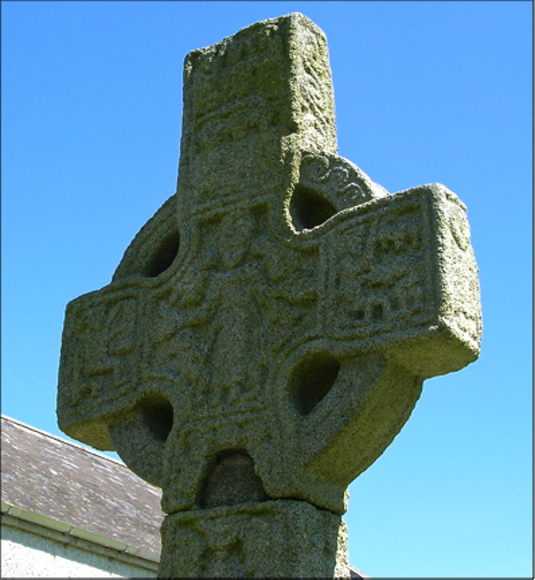
The Crucifixion fills the center of the head of the cross. The scene contains all the typical elements. Christ wears a long robe, Stephaton on the right offers vinegar while Longinus on the left thrusts a spear into Christ's side. Above Christ's arms angels fly toward his head. Following the pattern of the crucifixion scene on the north cross, Christ's arms seem to extend out from the elbows in an awkward pose.
The panel at the bottom of the head is damaged. There are three figures but no identifying attributes.
North Face: I don't have a photo that adequately shows the details of the north face. The image below does not render any detail, even when enlarged. What follows is Peter Harbison's identification of the various panels. (Harbison, 1992, pp. 40-41)
The base has an image identified as the Kiss of Judas on the right half of the base. The area on the left side of the base is left uncarved.
Harbison identifies most of the images on the shaft as part of the David cycle, images reflecting the life of King David. He suggests we read them from the top down.
Unidentified: This panel depicts two figures in profile. They seem to be embracing, though some have identified the scene as Jacob wrestling the Angel. Options related to the David cycle might include David embracing Absalom or Johathan, Samuel kissing Saul, or Saul loving David greatly.
David Arming Himself: The one figure in this tableau holds a round shield in the left hand and a sword in the right. Other interpretations include the Evangelist Matthew, The Massacre of the Innocents, or simply a chief or warrior.
David and Goliath: In an elongated panel there are two figures. The one on the right is large and holds a sword. The figure on the left is of smaller stature. Other interpretations include the Apostle Matthew and his angel and the Massacre of the Innocents.
David Slays Goliath: A large seated figure on the right has a much smaller figure sitting on his raised right leg. This figure looks back toward a sword. This would fit the moments before David beheaded the already defeated Goliath. Once again some interpret this as a scene from the Massacre of the Innocents. Other, less likely identifications include Aeneas escaping from Troy, the dwarf Cnu Deireoil singing to Finn and a Prophet and Evangelist.
David rejoicing or praying: One figure stands frontally with arms raised in a pose like the orans or prayer posture.
The Under Side of the Ring has a sunken panel that is undecorated.
The End of the Arm shows a single figure. No identification is made by Harbison.
The Top contains an S-spiral.
References cited:References cited:
CopticChurch.net, 1998-2005, http://www.copticchurch.net/synaxarium/6_2.html
Harbison, Peter; The High Crosses of Ireland: An Iconographical and Photographic Survey, Dr. Rudolf Habelt GMBH, Bonn, 1992. Volume 1: Text, Volume 2: Photographic Survey; Volume 3: Illustrations of Comparative Iconography.
Harte, Aidan and Richardson, Aine,"Archaeological Excavation Report 04E0750 - Castledermot town, Co. Kildare" Eachtra Journal, Issue 7, August 2010.
Smith-Christopher, Daniel L., The Additions to Daniel, Introduction, Commentary, and Reflections, The New Interpreter's Bible, Abingdon Press, Nashville, Vol. VII, 1996.