The David Cycle: On the Irish High Crosses
Introduction
David, the second king of the United Kingdoms of Israel and Judah, ancestor of Jesus of Nazareth, according to the Christian Gospels, first appears in I Samuel chapter 16. From that point David dominates the narrative of I and II Samuel. David’s reign was significant in the history of the Hebrew people as told in the Hebrew Scriptures. He was also seen by Christians, from the earliest period, as not only the ancestor of Jesus of Nazareth, but also as a prefiguring of Jesus. Helen Roe, author of “The David Cycle in Early Irish Art” put it this way, “This cycle was of importance, apart from its pictorial interest, as many of the episodes were regarded as parallels to and types of certain events in the life of Christ and further as symbolizing various aspects of Christian teaching.” (Roe, 1949, p. 39) Peter Harbison, author of The High Crosses of Ireland: An Iconographical and Photographic Survey agreed, stating “The frequency with which David makes his appearance on the crosses shows the interest which the early Irish church took in him, doubtless because he was presumably regarded as a pre-figuration of Christ as King, and also the ancestor of the house to which Christ belonged.” (Harbison, 1992, p.210)
In examining scenes on the Irish High Crosses that depict episodes from the David Cycle, my primary sources are the works of Helen Roe and Peter Harbison mentioned above. Their descriptions and interpretations of the many panels on the Irish High Crosses that depict some aspect of the David Cycle will be augmented here and there by other High Cross scholars. Roe and Harbison do not uniformly agree on which crosses bear these Davidic images or on the identification of the panels that depict scenes from the life of David. Below I will examine each of the panels identified by either of these noted scholars as containing or possibly containing an image from the David Cycle. Their arguments for and against the identification of certain panels will be explored and some personal observations will be noted that in some cases many offer a fresh assessment of some of the panels.
In total, Roe and Harbison identify 58 incidents of possible David Cycle images on the Irish High Crosses. These images appear on 28 different crosses. Both Roe and Harbison break these images down into several categories, matching some of the key events in David’s life story. Roe’s categories include: The Anointing of David; David Kills the Lion; David and Goliath; David Dancing, which does not occur on the High Crosses but can be seen on the Kilteel chancel arch; David as Warrior; and David as Harpist. To these basic categories, Harbison adds The Summoning of David, which Roe includes with the Anointing images; David Plays before Saul, which Roe includes with the David as Harpist images; David as Shepherd, which Roe omits from her listing; David arms himself, David encounters/smites Goliath, David slays Goliath, and David with the Head of Goliath, each of which Roe includes with the David and Goliath images; and David as King and David acclaimed King of Israel, most of which Roe includes under the heading of David as Warrior. Below I will use the following basic categories with some sub-divisions to address each of the subjects addressed by Roe and Harbison.
I. Samuel Summons David
II. Samuel Anoints David King
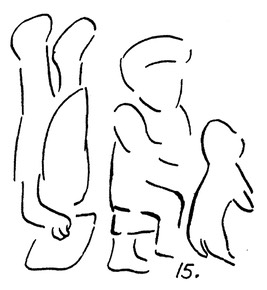
III. David Slays the Lion
IV. David Slays Goliath
V. David as Harper/Musician
VI. David as Shepherd
VII. David as Warrior/ Anointed King of Israel
I. Samuel Summons David: I Samuel 16:11-12
The Text:
11 Samuel said to Jesse, ‘Are all your sons here?’ And he said, “There remains yet the youngest, but he is keeping the sheep.” And Samuel said to Jesse, send and bring him; for we will not sit down until he comes here.” 12 He sent and brought him in. Now he was ruddy, and had beautiful eyes, and was handsome. The Lord said, "Rise and anoint him; for this is the one."
The Cross
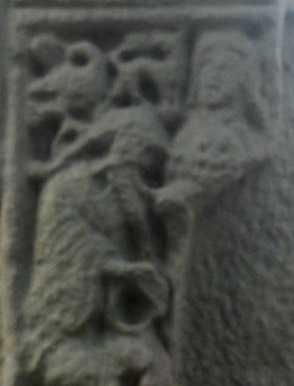
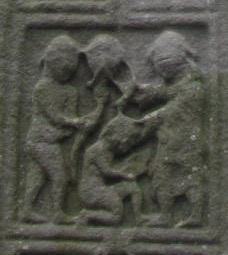
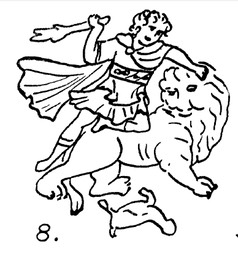
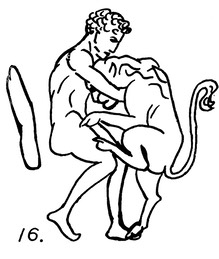
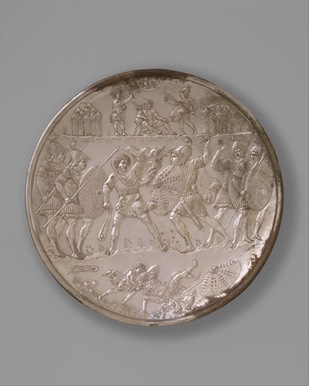
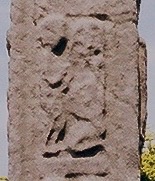
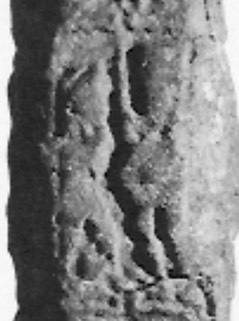
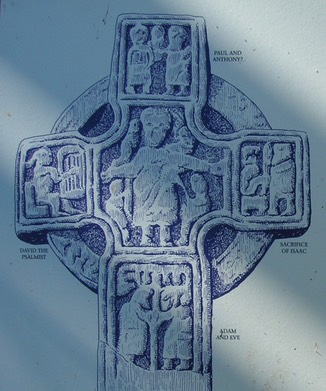
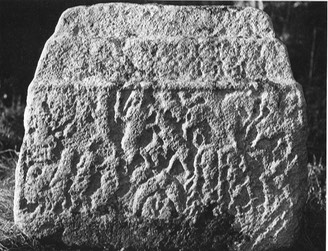
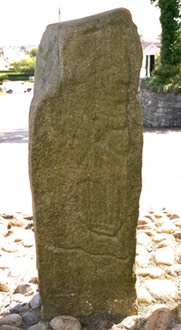
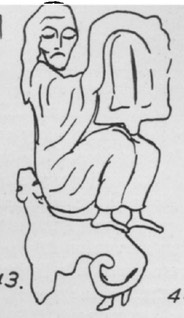
Kinnitty/ Castlebernard Cross, South 2
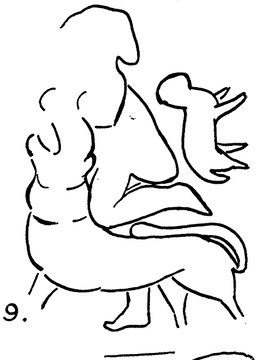
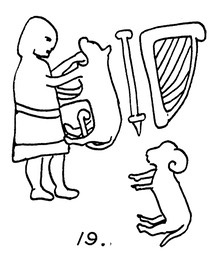
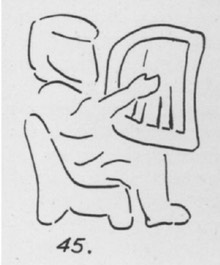
On this panel we have, on the left, a figure seated on a chair with what appears to be a harp or lyre on his knee. Above his head there is a bird, facing to the left but with its head and neck turned back to the right. On the right side of the panel is a standing figure, pictured in profile. He is dressed in a long robe and holds a staff or crook before him in his left hand. In his right hand he holds an object above the harp that has variously been described as a bell and a bucket. Though it is not clear to me, Harbison suggests that the figure on the right carries a bag on his back.
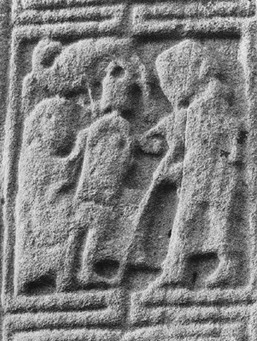

To the left is a photo from Harbison, 1992, Vol. 3, Fig. 711.
To the right is an illustration from Roe, 1949, p. 41.
Peter Harbison, suggests that this scene represents the Summoning of David. Helen Roe, identifies this scene as part of the anointing of David by Samuel. A detailed examination of the image and the two different interpretations follows.
This event is recorded in I Samuel 16:11-12, quoted above. In context, God had rejected Saul as king of Israel because of his disobedience. The prophet Samuel was sent to the house of Jesse and told that he was to anoint one of the sons of Jesse as king. He was told that he would be shown by God which son had been chosen. All the sons but one were present and rejected by God. David, the youngest son of Jesse was not present, as he was out tending the sheep. Samuel asked that he be sent for.
Harbison cites two earlier examples of this scene. (Harbison, 1992, p. 211) The first is a damaged carving on the door of the Basilica of St. Ambrose in Milan that is dated to the 4th century. In this scene David is seated under a tree and has one foot on a lion. The figure approaching David has been interpreted as Samuel but Harbison argues that it is more likely the messenger sent to fetch David. This identification is based on the fact that the figure raises a hand in salute to David. Neither the tree nor the lion appear in the scene at Kinnitty.
The second example cited by Harbison is a silver plate from Cyprus located in the Antiquities Museum in Nicosia and dated to about 629. In this case David is on the right and holds a lyre. With his other hand he greets the presumed messenger. The messenger holds a stick in his left hand and with his right hand greets David. In this case the attire of the messenger, a short tunic, and his youthful appearance make it clear that it is not Samuel. That David is in the countryside is also clear from the fact he sits on stones and there are two sheep at the bottom of the plate.
Because Roe describes the panel at Kinnitty as Samuel Anoints David, a full discussion of parallels she offers will appear under the next heading (Samuel Anoints David). Suffice it to note here that in each example Roe cites the figure identified as Samuel holds the traditional horn rather than a bucket-like container. This lends credence to Harbison’s identification of the object held by the supposed messenger as a bell rather than a bucket, though it is not definitive.
There are several issues to be addressed surrounding the identification of this scene. No meaning is attributed to the bird above David’s head. David is seated on what appears to be a chair. This seems to be out of place with his being in the fields tending the sheep. The meaning of the traveling bag, if such it is, is not explained. Finally, there is the discussion of whether the figure on the right holds a bucket or a bell.
One translation note helps to clarify what Samuel said as the messenger went out to find David. Samuel said “we will not sit down until he comes.” John Mauchine author of 1and 2 Samuel in the New Century Bible, explains that this phrase does not mean to physically sit down. Instead it is a statement that the procession around the altar, set up for the sacrifice that was the excuse for Samuel to visit Jesse, will not proceed until David is present. (Mauchine, p. 129)
The Bird: No meaning is attributed to the presence of the bird above the head of David on the Kinnitty panel. It is possible that the bird represents the presence of the Holy Spirit. If this is correct and the scene represents the summoning of David, the meaning would be that the Holy Spirit was present even before David was anointed. The presence of the bird would fit better with the scene if it represents, as Roe argued, the Anointing of David. In this case it would follow the text of verse 13.
13 Then Samuel took the horn of oil, and anointed him in the presence of his brothers; and the spirit of the Lord came mightily upon David from that day forward. Samuel then set out and went to Ramah.”
There are at least two other David related images on the High Crosses that include a bird. One is an image of David as warrior or king on the Tall Cross at Monasterboice. As in the case of Kinnitty, Harbison mentions the bird in this case but does not offer any explanation of its presence. (see Harbison 1992, p. 151) The second example is on Muiredach’s cross at Monasterboice on the east face on the head. Here Harbison identifies an image of David sitting and playing his harp. There is a bird on the harp. In this case, Harbison suggests that the bird is whispering in David’s ear and he identifies this as the inspiration of the Holy Spirit. (Harbison 1992, p. 142)
If the bird has significance, especially as the Holy Spirit, the likelihood is that the image represents a moment in the text when David is actually in the presence of Samuel and being anointed.
The Chair: Depicting David seated on what appears to be a chair is out of place with his being in the field. As noted above, Harbison sites a parallel in, “The Summoning of David” on a silver plate. In this image the figure of David appears to be seated or leaning on a stone. To emphasise that David is tending the sheep, two sheep are depicted at the bottom of the scene. The presence of the bird in the Kinnitty scene, the absence of sheep and the presence of the chair seem to suggest that Roe might be correct in identifying this as part of Samuel Anointing David.
The Traveling Bag: It seems out of place that a messenger would have a traveling bag as he went out to summon David. Even though Roe does not mention or depict the bag, the presence of one might argue for an identification of the figure as Samuel. The presence of the traveling bag on the righthand figure, combined with the crook would fit well with the recent arrival of Samuel and his immediate departure to Ramah following the anointing of David as mentioned in verse 13.
The Bell or Bucket: Harbison does not explain his identification of the object in question as a bell. No such object is clearly present in either of the two parallels to this scene that he cites. However, his identification of the object as a bell may be based on the text itself that states that Samuel took a horn of oil. The object that the figure holds is certainly not a horn. Roe, on the other hand, finds parallels to the bucket in the object carried by the sponge-bearer in some images of the Crucifixion, and in scenes of the Holy Women at the Tomb in some Continental and Byzantine ivories dated to the 10th and 11th century. (Roe 1949, p. 42) As these events have very different contexts, the parallels have little meaning for the present image.
It is possible this scene follows David’s arrival before Samuel and the event of Samuel pouring the oil of anointing on David’s head. This would make sense of the bell or bucket as a bucket holding oil. It would also make sense of the presence of the bird above David’s head as the text proclaims that the spirit of the Lord came mightily upon David as indicated in verse 13. The identification of this object is arguable. On balance, given that David is seated on a chair and has a bird above his head, and irrespective of the identification of the bell/bucket, it seems that an identification of the scene as Samuel Anoints David is most likely. That is, the chair suggests a setting at the dwelling of Jesse rather than a setting in the fields. The bird, if interpreted as the Holy Spirit suggests the setting of verse 13 where Samuel actually anointed David.
II. Samuel Anoints David King: I Samuel 16:11-13
The Text
11 Samuel said to Jesse, ‘Are all your sons here?’ And he said, “There remains yet the youngest, but he is keeping the sheep.” And Samuel said to Jesse, send and bring him; for we will not sit down until he comes here.” 12 He sent and brought him in. Now he was ruddy, and had beautiful eyes, and was handsome. The Lord said, "Rise and anoint him; for this is the one. 13 Then Samuel took the horn of oil, and anointed him in the presence of his brothers; and the spirit of the Lord came mightily upon David from that day forward. Samuel then set out and went to Ramah.”
The Crosses:
Duleek North Cross, west 2Roe only
Galloon West Cross, south lower partRoe only
Kells, Market Cross, west 3Harbison only
Kells Market Cross, East, head, below Daniel
Kinnitty Cross/ Castlebernard, east 2
Monasterboice West or Tall Cross, east 4, right
Duleek North Cross, west 2
On the right in this panel is a figure that is standing and facing a seated figure on the left. Between the two is what appears to be a large horn-shaped object. In the upper center of the panel is an object that cannot be clearly distinguished.
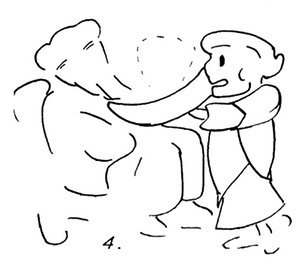
Roe identifies this as an example of Samuel Anointing David, but does not describe the scene. She does, however suggest that the seated figure is David while the smaller standing figure is Samuel. The illustration below left is from Roe, 1949, p. 41; the photo of this panel below right was taken by the author.
If the unidentified figure between the two main characters is identified as a bird, it would support Roe’s identification of the scene as Samuel Anoints David. In addition, the horn-like object between the two figures is similar to that on the Castlebernard or Kinnitty cross described below.
Harbison identifies this panel as An Angel Brings Bread to the Virgin in the Temple. In support of this identification he also identifies the scenes above and below this panel as related to the birth of the Virgin Mary, the mother of Jesus. The upper scene he identifies as Joachim and Anne Fondling the Infant Virgin. This would connect the scene with a non-biblical story related to the birth of the Virgin Mary. The scene below he identifies as Joachim and Anne Greeting One Another at the Golden Gate. (Harbison, 1992, p. 77) If the unidentified object in the upper center of the panel was identified as the head of the Virgin Mary, being held by her mother Anne, it would support Harbison’s identification.
Some background on Joachim and Anne might be helpful at this point. These two are understood to be the parents of the Virgin Mary. This legend is largely based on the Gospel of James, an early Christian Gospel that was not included in the Christian Scriptures (the New Testament). This was supported by the later Christian Gospel of Pseudo-Matthew that existed in manuscript form as early as c. 800. Sherry L. Reames, in an article entitled “Legends of St. Anne, Mother of the Virgin Mary: Introduction” the the book Middle English Legends of Women Saints points out that in the west an early depiction of Anne and the Virgin is found in an 8th century fresco in the church of Santa Maria Antiqua, Rome. (Reams) This suggests the possibility that the scenes on the Duleek cross do in fact depict images related to the cult of Anne. If Harbison is correct in his identification, then none of the figural images on the Duleek cross are biblical in theme except the Crucifixion on the west head of the cross.
It should be noted that other scholars have made different identifications of the panel. Crawford suggested it might represent the Presentation or the Holy Family; Henry identified the scene as The Holy Family or the Adoration of the Magi while Roe and Weir identified it as “The Anointing of David” and Gsanger saw it as The Meeting of Paul and Anthony. There are also, of course, other interpretations of the panels above and below the one under consideration. In the case of all three panels, identifications related to the Holy Family and the Visitation of Mary to Elizabeth could place these panels in the Christian Scriptures or New Testament rather than in the Hebrew Scriptures or Old Testament.
The interpretations mentioned above tend to set the scene in context with the other panels on the west side of the shaft in the Christian and non-canonical Christian texts. While any identification can only be tentative, Harbison’s interpretation of this as related to Christian texts is to be preferred.
Galloon West Cross, South side lower
The carving on this face of the cross is badly worn, making any identification tentative. Roe believed the lowest part of the south shaft shows a seated figure with a standing figure before it, so possibly Samuel Anointing David. Harbison sees the scenes here as so worn that they cannot be identified. He suggests there are two figures embracing on the lower part of the south side of the cross.
Details are so vague that Harbison is correct in declining to make an identification.
The photo to the right is from Harbison, 1992, Vol. 2, Fig. 295.
Kells, Market Cross, west 3
In this scene, below left, a tall figure on the right stands before a kneeling figure on the left. Above the head of the kneeling figure there are two animals, a bird on the left and a quadruped above with a tail and having its head turned back over its body. The kneeling figure appears to have long hair and facial hair. He holds an object in his right hand against his knee. The object appears to be round.
Harbison identifies this scene as a possible example of Samuel Anointing David. He bases his identification on several factors. The figure identified as Samuel appears to touch the head of the kneeling figure with his right hand and may hold a horn in front of the face of the David figure with his left hand. In addition, and more clearly visible, there is a bird in the upper left-hand corner of the panel and in the center-top of the panel there is an animal that Harbison identifies as a sheep. (Harbison, 1992, p. 106)
The figure of the bird above the kneeling figure, if identified as the Holy Spirit, fits with the scene as an anointing. The figure Harbison identifies as a sheep could just as easily be identified as a lion. Regardless, the lion is also a common feature of a David scene. On the other hand, the kneeling figure does not appear to be a young man, as David was when he was anointed by Samuel.
Roe identifies this scene as Jesus Healing the Blind Man, John 9:1-12. In her description of the scene she notes that the man kneeling is bearded. She suggests that the figure on the right covers the forehead and one eye of the kneeling figure. Roe, in her booklet The High Crosses of Kells dismisses the two small figures above the kneeling man as having “no direct association with the subject but are, almost certainly survivors from an original scene depicted within an architectural frame on which fanciful creatures were set on the cornices of the pediment above.” (Roe, 1988, p. 33) This is an entirely unsatisfactory explanation of the two small animal figures.
Harbison’s critique of Roe’s identification is based on his assertion that most scenes of Jesus healing the blind involve children or men holding a stick. However, there may in fact be a stick or more precisely a crooked stick in front of the figure kneeling. The outline is at the point where damage has been done to the figure standing. This could, of course, just as likely be the staff carried by Samuel in the scene on the Kinnitty cross, described below.
Harbison also points out that that the scenes above and below the one in question are likely Hebrew Scripture scenes: a Moses panel above and a probable Judgment of Solomon scene below. This would suggest the panel in question is also likely a Hebrew Scripture scene. This is in contrast with Roe’s identification of the other scenes on this side of the cross. She identifies the scene below the one under consideration as the Slaughter of the Innocents and the scene above as Moses Receives the Law. The scene on the end of the arm is David Slays the Lion. Thus Roe splits identifications between the Hebrew and Christian scriptures while Harbison sees a consistent Hebrew Scripture theme.
A key issue in the identification of the scene is the apparent maturity of the figure kneeling. It is difficult to see this as a young David. Roe’s identification of the scene might be preferred, if only on this basis, though, as noted above, it is also problematic.
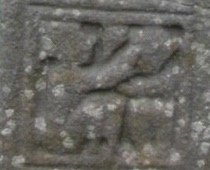
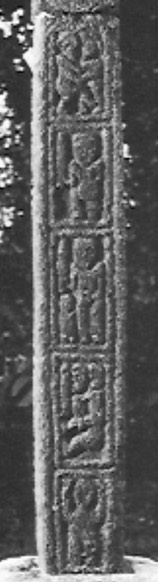
Kells Market Cross, East or South, head, below Daniel in the Lion’s Den
The image here is located on what Roe refers to as the East Face of the cross and what Harbison refers to as the South Face of the cross. This difference is one related to the present versus the possible original positioning of the cross.
In the lower contraction of the head of the cross, below a scene of Daniel in the Lion’s Den, is an image that Roe describes as follows: “On left a person seated, before whom another stands. The carving is blurred and far from clear but is, I think, similar to a panel on Duleek N. and to another, similarly placed between the angels on Killamery.” (Roe, 1988, p. 30)
This small image is identified by Harbison as David Playing His Lyre. This image will be considered below under the topic of David as Harper/Musician. Suffice it to say here that on close examination, Harbison’s identification is to be preferred.
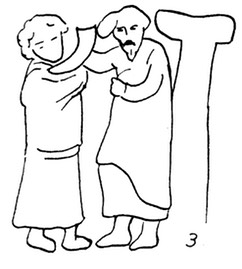
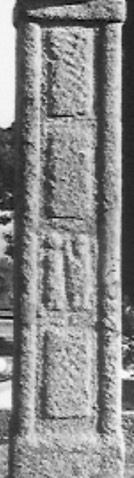
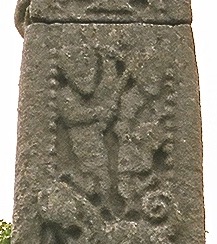
Kinnitty/ Castlebernard Cross, east 2
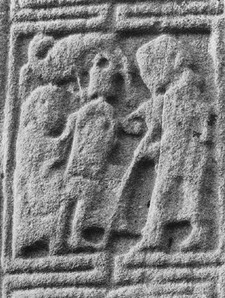
This image, to the left, was described and discussed above under the heading of Samuel Summons David. Here, as promised above, I will outline some of the parallels Roe found in support of her identification of this image as one of David Anointed by Samuel. She mentions an image in the Paris Psalter where Jesse is shown with all his sons. She offers an illustration of an image in the Homilies of Gregory of Nazianzus that is dated to the end of the 9th century (see image below left). She also offers an illustration from a Romanesque doorway at Freshford where both figures are standing (see image below right). Both of the images below are found in Roe 1949, p. 41.
To the left is a photo from Harbison, 1992, Vol. 3, Fig. 711.

The West or Tall Cross at Monasterboice, east 4, right

The panel here contains a composite of two events from the David cycle that are not related in time in scripture. On the left David holds the head of Goliath. This portion of the panel will be addressed below under the heading of “David Slays
Goliath.” On the right side of the panel a figure identified as David kneels on one knee before a figure identified as Samuel. Samuel holds a horn from which he presumably anoints David with oil. With his left hand he touches David’s brow. David does not appear to be clothed. He may hold his harp in his hands in front of his body. Both Roe and Harbison agree on both identifications on this panel.
To the left above is a photo taken by the author. To the right is an illustration from Roe, 1949, p. 41.
Category Summary
Of the six panels discussed above, three are listed as possible identifications of Samuel Anointing David. Regarding the other three, Harbison and Roe disagree on the identification of all but one. I have suggested that the Duleek example might, as Harbison suggests, be an image related to the Holy Family, a Christian Scripture image. The Galloon example is, as Harbison suggests, too worn to offer any potential identification. I prefer Roe’s identification of the image on Kells Market Cross, west 3 as Jesus Healing the Blind Man, to that of Harbison which places this image in the Christian Scriptures. The image on the Kells Market Cross on the east/south face is most likely, as Harbison suggests, an image of David as Harper rather than Samuel Anointing David. The image on the Kinnitty/Castlebernard Cross, as suggested above probably fits best with Roe’s identification rather than Harbison’s suggestion that this is Samuel Summons David. This leaves only the image on the Tall Cross at Monasterboice as a clear example of the type that both Roe and Harbison agree represents Samuel Anointing David. Thus only two images, one at Kinnitty/Castlebernard and one on the Tall Cross at Monasterboice have an obvious and agreed on identification as being part of the story of the Anointing of David by Samuel.
The key iconographic elements in this category are the presence of two figures facing each other and the presence of a horn or bucket for the oil of anointing. In four of the six possible panels described above as depicting Samuel Anointing David the figure of David appears to be seated. In the other two examples the figure of David kneels before Samuel. The presence of a horn for anointing is possible at Duleek, Kells Market Cross west 3 and the Tall Cross at Monasterboice, east 4, right. On the Kinnitty/Castlebernard Cross the anointing object is, according to Roe, a bucket. No object is obvious at Galloon or on the Kells Market Cross, east or south head, below Daniel in the Lion’s Den.
III. David Slays the Lion
The Text
34 But David said to Saul, "Your servant used to keep sheep for his father; and whenever a lion or a bear came, and took a lamb from the flock, 35 I went after it and struck it down, rescuing the lamb from its mouth; and if it turned against me, I would catch it by the jaw, strike it down, and kill it. I Samuel 17:34-35
This text appears as part of David’s argument to King Saul that he is capable of confronting and defeating the giant Goliath.
The Crosses
Harbison followed a typology outlined by Roe, who identified two types of this image on the Irish High Crosses. There is one exception in this typology as Harbison placed the Armagh, South 3 image in Type I while Roe mentioned it related to Type II. Type I images tend to have David on the back of the lion while Type II images tend to have David encountering a lion while he is standing. In the descriptions of each image below I follow the arrangement of Roe.
Type I
Arboe, South 2
Drumcliff, National Museum, Lower fragment, East 2
Durrow, Cross, East face, North arm
Kells, Market Cross, West side, End of arm
Kells, Patrick and Columba’s Cross, End of south arm
Kilamery
Monasterboice, Tall Cross, East 1
Newtown, West face, South arm
Oldcourt, Base, East face, Lower panel, right
Old Kilcullen, West shaft, North 1
Type II
Armagh, South 3
Donaghmore, County Down, East 4, right
Galloon West Cross, top part of south shaft
Kells, Patrick and Columba’s Cross, End of north arm
Old Kilcullen, West shaft, West 3
Introduction
Roe pointed out that the “cult-hero’s combats with various wild beasts, such as lions and bears or wild bulls or stags is common throughout classical and Asiatic myth.” (Roe, 1949, pp. 42-43) She also noted that any given illustration of this scene must be distinguished from Samson killing a lion (Judges, 14:56). In David Slays the Lion scenes there will typically be a shepherd’s crook or a sheep or ram in the image. She addressed the symbolic meaning attributed to these two images by early Christian interpretation: “David’s deliverance of the lamb being equated with Christ’s deliverance of man from death while Samson’s exploit is used as the type for the descent of Christ into Hell whence he shall bring the saved.” (Roe 1949, p. 43)
Type I Crosses
Type I images have David on the lion’s back with hands wrenching the lion’s jaws apart, or as at Arboe with hands on the head of the lion.
There is typically a lamb or ram in the background, sometimes two sheep appear. On the Arboe cross there is what appears to be a dead sheep below the lion and a live sheep above. On the Monasterboice Tall Cross there are two live sheep moving away from the action to the right. At Old Kilcullen there is a ram below the lion’s belly. At Durrow a single sheep is in front of the action and looks back to the right. At Kells on the Market Cross there is a ram above David’s back. Similar to this but located vertically, there is a sheep behind David on the Patrick and Columba Cross at Kells. Not enough of the panel remains on the Drumcliff cross to know if a sheep was included above the lion’s back. On the Newtown and Oldcourt crosses the images are difficult to discern.
In some panels David’s crook and a slingshot stone are included. This is the case at Durrow, the Kells Market Cross and the Monasterboice Tall Cross. On the Arboe cross the image faces to the right. On the rest of the cross where the scene is discernible, the scene faces to the left as on the Durrow cross. In a few instances, defying human anatomy, David’s left leg is seen extending below the lion’s belly. This is particularly true on the Kells Patrick and Columba and Monasterboice Tall crosses.
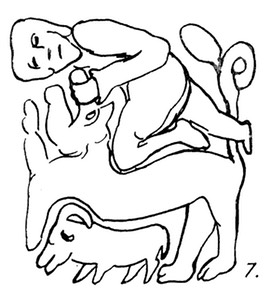
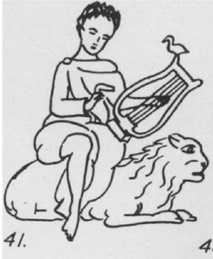
Arboe, South 2
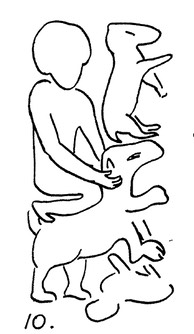
In this image, David is depicted as being astride the back of the lion. The lion’s mouth is open but the hands of David do not obviously pry the jaws apart. The right hand is seen on the side of the head while the left hand is obscured by the head of the lion. Below the lion is the figure of a lamb that appears to have been slain by the lion. Above the head of the lion and in front of David a sheep is worked in horizontally. The illustration to the left is from Roe, 1949, p. 44. The photo to the right was taken by the author.
Roe noted that this particular image follows the pattern on a Cyprus dish illustrated below. Roe does not provide information on the date of this silver dish, however, it is dated to 629-630 by the Metropolitan Museum of Art in New York City. The photo to the left is taken from their website as listed below in the Resources Cited. The illustration to the right is from Roe, 1949, p. 44.
Drumcliff, National Museum, Lower fragment, East 2
This image requires some interpretation as the top part of the panel is broken off. What we see is an animal that appears to have five legs. On the upper left something appears to be pressing into the animal’s back.
Roe does not mention this image related to the theme of David Slays the Lion. Harbison includes it in his list of of Type I images. He suggests that what we see is the lion’s legs and lower body. The apparent fifth leg can be identified as David’s leg. The object pressing into the back of the animal can be identified as David’s knee on the back of the lion.
The photo to the left was taken by the author.
Durrow, Cross, East face, North arm
This image appears on the arm and in the contraction of the arm. In the contraction of the arm there is a sheep with head up and turned back toward the main scene. On the arm David is astride the lion, his left knee in the lion’s back and his right leg extending back. We see David’s left arm and hand grasping the upper jaw of the lion and pulling its head back. There is additional carving in the upper right corner of the arm that Harbison does not address. It is likely the crook and slingshot stone present in several of the other images.
The photo to the left above was taken by the author, that to the right is from Roe, 1949, p. 44.
Kells, Market Cross, West side, End of arm
In this scene David is on the back of the lion with his left knee in the lion’s back. The lion appears to have five legs, the center of which is the lower portion of David’s right leg. In the upper right corner is a sheep, below which is what, by comparison with the image on the Durrow Cross discussed above can be identified as David’s staff and a stone for his slingshot.
The photo above left was taken by the author, the illustration to the right is from Roe, 1949, p. 44.
Kells, Patrick and Columba’s Cross, End of south arm
This scene is similar to the one above. David is on the back of the lion with his left knee in the lion’s back and his right leg and foot are seen below the lion’s belly. He pulls back on the upper jaw of the lion. There is a sheep behind David that in this case is worked in vertically.
The illustration to the left above is from Roe, 1949, p. 44. The photo to the right was taken by the author.
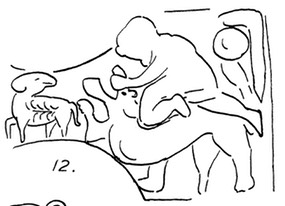
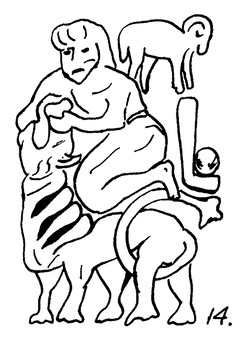
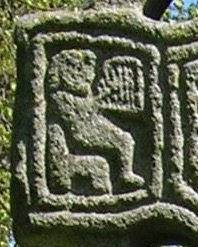
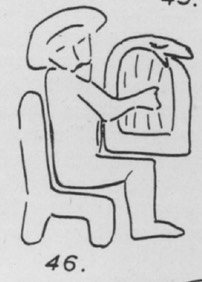
Killamery Cross, North, end of arm upper right
Roe identifies this scene as a composite of the slaying of Goliath on the left and David slays the lion on the right. More will be said about the possible Goliath portion of the scene below under the heading of David Slays Goliath. From the illustration below right it is clear that Roe identifies the shape to the right in the panel as a lion. Harbison identifies the scene as Salome Dancing for the Head of John the Baptist. He suggests that Salome is shown dancing on her head while the figure of Herodias in the middle carries the head of John, shown on the right. Harbison also offers possible identifications of the other three images on the end of the arm as relating to John the Baptist. In the photo from Harbison above left it is difficult to picture the the shape on the right center of the panel as a lion. There does not appear to be a body. In its present condition the panels have deteriorated to a point where it is impossible to see enough detail to form a reasonable conclusion.
The illustration to the right is from Roe 1949, p. 44. The photo above left is a detail from Harbison, 1992, Vol. 3, Fig. 789.
Monasterboice, Tall Cross, East 1


This image has all the aspects of the scene on the Kells Market Cross discussed above. David is on the back of the lion with his left knee in the lion’s back. His right leg extends below the lion’s belly. In both panels the anatomy of David is out of proportion. His right leg could not possibly be as long as it seems. In this panel we have two sheep, both with their backs to the scene, the lower one appearing to actively run away. The lion’s tail is wrapped around is hind quarters. Between David and the sheep is another image of his staff and a slingshot stone. In this case David appears to wear a hat and there is an indication that he is wearing a short tunic that is belted at the waist.
The photo to the left above was taken by the author while the illustration to the right is from Roe, 1949, p. 44.
Newtown, West face, South arm

Based on the photograph to the left below, it is impossible to see any details of the south arm carving. Harbison lists this cross with a question mark regarding the image of David Slays the Lion. He states that the image had not previously been identified. Roe does not mention this cross as having such an image.
The photograph to the left is from Harbison, 1992, Vol. 2, Fig.425.
Oldcourt, Base, East face, Lower panel, right
As with the image above, Harbison lists the image on the right side of the panel below as David Slays the Lion with a question mark. He is more confident about identifying the image on the left of the panel as St. Michael Weighing Souls. (Harbison, 1992, p. 159) This scene can be seen with little difficulty. Regarding the image on the right, the imagination can identify some aspects of the image that resemble other scenes of David Slaying the Lion. As with the image on the Newtown cross above, Roe does not mention this image.
 Is there a connection between the image of St. Michael Weighing Souls and that of David Slaying the Lion? The connection may be hinted at by Roe, who pointed out that David’s deliverance of the lamb from the lion could be seen as a reference to Christ’s deliverance of man from death. If this is so, with a bit of a stretch, there could be a connection that suggests that while each soul will be judged, Christ, through his death and resurrection, acts to rescue or save each soul.
The photo to the right is from Harbison, Vol. 2, Fig. 528 modified.
Old Kilcullen, West shaft, North 1
This image is perfectly clear in the photograph below right from Harbison, Vol. 2, Fig. 535. In the illustration to the left, from Roe, 1949, p. 44, we can see that David is on the back of the lion. His left knee is in the lion’s back while his right leg is extended backward. He grasps the upper jaw of the lion and pulls the head back. Below the body of the lion a sheep or ram is worked in. The tail of the lion is up and curls in a circle at the upper end.

Type II Crosses
Armagh, South 3
Donaghmore, County Down, East 4, right
Galloon West Cross, top part of south shaft
Kells, Patrick and Columba’s Cross, End of north arm
Old Kilcullen, West shaft, West 3
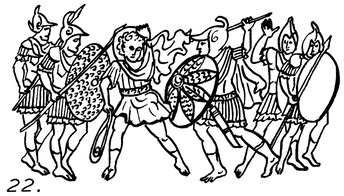
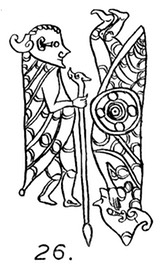
Roe explains that Type II crosses are generally located in the north of Ireland and follow the pattern of the image on Scottish crosses. However, this is true of only three of the five crosses listed above. She further notes that this design “seems to derive from some classical motif such as was employed to depict Hercules and the Nemean Lion.” The difference is that the hero’s club is replaced by the shepherd’s crook. The illustration, to the right, shows this scene from the life of Hercules.
The quote above and the image to the right are from Roe, 1949, pp. 45-46.
Armagh, South 3
Roe noted that this image is so badly deteriorated that it is impossible to recover any details. However, at the same time, she lists it as related to Type II images. (Roe, 1949, pp. 45 and 47)
Harbison wrote of this panel “This much-abraded panel shows David mounted on the back of a rampant lion, tearing its jaws apart. A sheep is seen above it.” (Harbison, quote p. 21, photo the the left Vol. 2, Fig. 46) His description would seem to place this image with Type I illustrations.
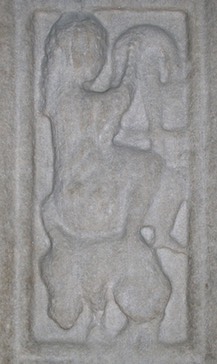
Donaghmore, County Down, East 4, right
This panel contains a compound image. On the left David holds up the head of Goliath. This portion of the panel will be discussed under the topic of David Slays Goliath. On the right, David grasps the jaws of a small lion that is depicted vertically to his right.
Roe likens this image to the type of the Aldbar, Scotland Cross Slab illustrated to the right. The Aldbar image shows David in profile while the Donaghmore image shows him facing forward. In both cases he seems to hold a lion by the jaws and the lion is shown vertically. In the Aldbar image there is a ram in the lower right corner and above it is David’s harp and either a club or a staff.
Harbison notes that it is possible that David holds something, perhaps a weapon, in his right hand. (Harbison, 1992, p. 62) This could also simply be his right hand on the upper jaw of the lion.
The illustrations above are from Roe, 1949, p. 46, Figs. 18 and 19. The photo above right is a detail of a photo from Harbison, 1992, Vol. 2, Fig. 183.
Galloon West Cross, top part of south shaft
While Roe makes a tentative identification of the upper portion of the south shaft at Galloon as representing David Slays the Lion, Harbison suggests that the images on this side of the cross-shaft are too worn to identify.
Harbison identifies two figures embracing on the lower portion of the shaft and suggests it could represent John the Baptist Embracing/Recognising Christ in the Desert. Above this he sees two figures facing each other and perhaps seated. They could represent Saints Paul and Anthony. He does not, however address the image above this on the top of the shaft. This is the location where Roe believes she can see hints of David Slays the Lion. (Harbison, 1992, p. 92 and Roe 1949, pp. 45 & 47)
The photo to the right was taken by the author.
Kells, Patrick and Columba’s Cross, End of north arm
On this panel, below, we clearly see a human figure facing toward the right and holding in his right hand an object that curves from his head at the top to below his waist in the back. Harbison has noted that the upper end of this object appears to have an animal head. (Harbison, 1992, p. 111) In comparison with the Kells Market Cross and Monasterboice tall Cross images discussed above under Type I images, it is just possible that this unidentified object could represent David’s staff. The animal in front of him is small and has been identified as both a lion and a bear. It appears to bite the central figure’s waist while being grasped by the figure’s left hand.
 The identification of this scene as David Says the Lion is complicated by the fact that on the end of the south or opposite arm there is an image that is clearly David Slays the Lion. Roe is one scholar who suggests that this may be a much rarer scene, that of David Slays the Bear. Such an interpretation is allowed by the text. (Roe, 1949, p. 47) 34 But David said to Saul, "Your servant used to keep sheep for his father; and whenever a lion or a bear came, and took a lamb from the flock, 35 I went after it and struck it down, rescuing the lamb from its mouth; and if it turned against me, I would catch it by the jaw, strike it down, and kill it. I Samuel 17:34-35 In possible support of Roe’s identification, the ends of the arms on the Patrick and Columba Cross could represent both aspects of the boast David made to King Saul that eventuated in his facing Goliath.
Another alternative interpretation is that this represents Samson and the Lion. Harbison notes that several scholars have offered this identification. (Harbison, 1992, p. 111) This story is told in Judges 14:5-6. 5 Then Samson went down with his father and mother to Timnah. When he came to the vineyards of Timnah, suddenly a young lion roared at him. 6 The spirit of the Lord rushed on him, and he tore the lion apart barehanded as one might tear apart a kid. In support of this it could be noted that there is no sheep in the image. However, there is also no sheep in the image on the Donaghmore/Down cross considered above. Against this interpretation is the fact that Judges states that Samson used his bare hands. In this image the figure of David/Samson holds an unidentified object in his right hand.
Harbison, who identified the image on the end of the south arm as David Slays the Lion, also suggests with a “?” that this may represent the same image. He offers no explanation of the presence of two similar images on the same cross, but notes that the same can be said of the Old Kilcullen west shaft, which will be considered next. (Harbison, 1992, p. 111 & 216)
The photo above left was taken by the author.
Old Kilcullen, West shaft, West 3
On this panel we see a human figure, presumably David, on the left. He holds something over his right shoulder that Harbison identifies as a sword. Before him, with feet on the right side of the panel, is a lion facing away from David with the back arched. David’s left hand seems to stick into the mouth of the lion. As we have seen above, there is another scene on this cross-shaft of David Slays the Lion that is a Type I image.
As with the image discussed above on the Patrick and Columba cross at Kells, there are those who identify this as Samson Slays the Lion. As above, Harbison discounts this identification because of the sword. (Harbison, 1992, p. 160) The presence of the sword also weighs against the image representing David as his boast of killing a lion referred to his career as a shepherd, not a warrior. Thus, the iconography of this image does not exactly align with either David or Samson slaying a lion. The identification of this scene is problematic both for the reasons stated above and because there is another scene on this cross (noted above under Type I images) that is more clearly David Slays the Lion. Is it possible that the object David holds is not a sword but his shepherd’s staff?
Category Summary
There are 15 possible appearances of the image of David Slaying the Lion. On two crosses, Kells Patrick and Columba and Old Kilcullen, the image appears, or seems to appear twice on the same cross. Thus a maximum total of 13 different crosses bear this image In four instances, at Newtown, Oldcourt, Armagh and Galloon, the details are so deteriorated that only very tentative identification can be suggested.
The iconographic keys where details are clear are simply a lion and a human figure with one or more hands near the jaws of the lion. In most cases, especially with Type I images there are several additional iconographic details. These include one or more sheep, present in all Type I images with the possible exception of the broken panel at Drumcliff and the crosses at Newtown and Oldcourt where the details are not clear. On three Type I crosses, Durrow, Kells Market Cross and Monasterboice Tall Cross there is the addition of a staff and sling stone. It is possible, as I suggested above, that there is another example of the presence of a staff on the Old Kilcullen cross among the Type II images.
III. David Slays Goliath: I Samuel 17:40-51
The Text
40 Then he took his staff in his hand, and chose five smooth stones from the wadi, and put them in his shepherd's bag, in the pouch; his sling was in his hand, and he drew near to the Philistine. 41 The Philistine came on and drew near to David, with his shield-bearer in front of him. 42 When the Philistine looked and saw David, he disdained him, for he was only a youth, ruddy and handsome in appearance. 43 The Philistine said to David, "Am I a dog, that you come to me with sticks?" And the Philistine cursed David by his gods. 44 The Philistine said to David, "Come to me, and I will give your flesh to the birds of the air and to the wild animals of the field." 45 But David said to the Philistine, "You come to me with sword and spear and javelin; but I come to you in the name of the Lord of hosts, the God of the armies of Israel, whom you have defied. 46 This very day the Lord will deliver you into my hand, and I will strike you down and cut off your head; and I will give the dead bodies of the Philistine army this very day to the birds of the air and to the wild animals of the earth, so that all the earth may know that there is a God in Israel, 47 and that all this assembly may know that the Lord does not save by sword and spear; for the battle is the Lord's and he will give you into our hand." 48 When the Philistine drew nearer to meet David, David ran quickly toward the battle line to meet the Philistine. 49 David put his hand in his bag, took out a stone, slung it, and struck the Philistine on his forehead; the stone sank into his forehead, and he fell face down on the ground. 50 So David prevailed over the Philistine with a sling and a stone, striking down the Philistine and killing him; there was no sword in David's hand. 51 Then David ran and stood over the Philistine; he grasped his sword, drew it out of its sheath, and killed him; then he cut off his head with it.
Harbison splits the story of David and Goliath into four different parts, each a distinct phase of the story. He begins with David Arming himself or more accurately Saul dressing David in his own armour. This portion of the story is told in I Samuel 17:38-40. David is unable to walk with this heavy armour on and so rejects it.
The second aspect of the story identified by Harbison is that of David Encountering and Smiting Goliath. This encounter has its climax in I Samuel 17:49 when David downs Goliath with a stone from his slingshot.
The third aspect of the story appears in I Samuel 17:51. In this portion of the encounter, David takes Goliath’s sword to kill him and cut off his head. In the text, reported above, it appears that David killed Goliath twice. First he strikes him in the forehead with a stone. The text records that “David prevailed over the Philistine with a sling and a stone, striking down the Philistine and killing him.” In the very next verse David “grasped his (Goliath’s) sword, drew it out of its sheath, and killed him.” Only then did he cut off Goliath’s head.
The final part of the story is more suggested in scripture than told. The images on the High Crosses that will be considered show David carrying the head of Goliath and in some cases bringing it to Saul. The text in I Samuel 17:54 simply states that David brought the head of Goliath to Jerusalem. Logic would suggest that at some point in time the head was presented to Saul. The text also notes that David kept Goliath’s armour in his tent, without answering the question of where this tent was.
Harbison identifies various of the scenes described above on thirteen crosses while Roe suggests that scenes of the encounter with David appear on five of these crosses. She adds one additional cross that Harbison does not include in his list. On the Kilamery cross she sees a combining of the slaying of Goliath and the slaying of the lion. This scene was briefly discussed above under the heading of David Slays the Lion.
In discussing the story of David and Goliath, Roe points out that theologically the story speaks of God’s power to save His servants from deadly danger. (Roe, 1949, p. 49) She notes that this story is referred to in the Litany of Oengus and in a “poetical prayer against the plague attributed to Colman MacChlusaigh, for legind, of Cork.” (Roe, 1949, p. 49)
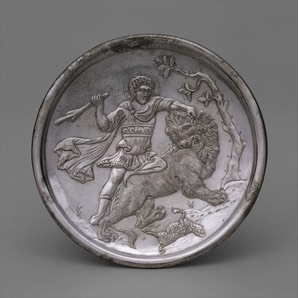
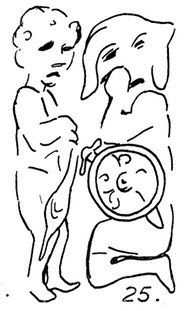
For comparison she refers to a silver dish from Continental art shown below left. (https://www.metmuseum.org/art/collection/search/464377) Roe includes an illustration of the center portion of this dish as shown below right. (Roe 1949, p. 48)
On the top of the dish we see the challenge of David to Goliath, or more accurately David’s response to the challenge of Goliath. In the center of the dish we see the actual encounter with David in a short tunic holding a stone in his slingshot in his right hand. On the bottom we have the scene of David beheading Goliath. (Roe, 1949, p. 49)
The crosses under consideration are as follows, applying the sub-categories of Harbison.
David Arms Himself
Castledermot, South, North 4
David Encounters/Smites Goliath
Arboe, south 3
Armagh, south 2
Castledermot, south, north 3
Donaghmore/Down North 2
Monasterboice, Muiredach’s east 2
Ullard, east face, head, upper panel
Killamery with the slaying of a lion
David Slays Goliath
Castledermot, south, north 2
Drumcliff, east 4
David with the Head of Goliath
Donaghmore/Down, east 4 left
Killary, north 1
Monasterboice tall east 4 left
Seir Kieran, base east upper left
A. David Arms Himself
Castledermot, South, North 4
A figure is shown facing forward. In his left hand he holds a round shield before his body. In this right hand he holds a sword upright. In context with his identifications of the other panels on this side of the cross, Harbison identifies this as David Arms Himself. This reflects the text of I Samuel 17:38-40 where Saul puts his own armour on David but, unable to walk in the armour, David rejects it and goes to meet Goliath with only his staff and slingshot.
Harbison identifies the scenes on the north side of the cross as follows, running from the top to the bottom. N 5 he leaves unidentified. Two figures in profile appear to embrace. N 4 he identifies as David arming himself before Saul, who is not shown. N 3 he identifies as David Encounters/Smites Goliath. A tall figure, Goliath, stands on the right with sword upright in his right hand and a small square shield in his left hand. The figure of David on the left is smaller to emphasise the size of Goliath. N 2 he identifies as David Slays Goliath. The large figure of Goliath appears to sit with the smaller David on his leg. David holds a sword upright and appears ready to stab or behead Goliath. The N 1 panel he describes as David based on the context of the other panels. It is possible that David is standing in an orans attitude and rejoicing or praying following his victory.
Roe does not include any of these images in her list of scenes related to David and Goliath.
In the photo to the far right the panel under consideration is the fourth from the bottom. This photo is from Harbison, 1992, Vol. 3, Fig. 733. The photo to the left above was taken by the author.
B. David Encounters/Smites Goliath
Arboe, south 3
Armagh, south 2
Castledermot, south, north 3
Donaghmore/Down North 2
Killamery with the slaying of a lion.
Monasterboice, Muiredach’s east 2
Ullard, east face, head, upper panel
Arboe, south 3
The figure of David stands in profile on the left. His slingshot is hanging down from his hand. The larger figure of Goliath is on its knees in front of David. He holds a shield with a sword behind it. With his left hand he reaches up to his face, where he has been struck by the stone from David’s slingshot. While his body is in profile, his head appears to be turned to the front.
The photo to the right was taken by the author. The illustration to the left is from Roe, 1949, p. 50.
Roe points out that this illustration is very similar to an image, below left, from an Irish Psalter (Vitellius F, XI) in the British Museum. David holds both a staff and his slingshot. Goliath kneels before him holding his shield and raising his right hand to his head. A similar image is found in an Irish Psalter in St. John’s College, Cambridge, below right. In this illustration David holds a staff but the slingshot is not obvious. In addition, Goliath is depicted upside down. The illustrations below are from Roe 1949, p. 50.
The illustration to the left is from the Irish Psalter in the British Museum.
The illustration to the right is from the Irish Psalter in St. John’s College, Cambridge.
Armagh, south 2
This side of the cross is badly worn. On this panel we have two figures of equal size facing each other. The figure on the right holds a shield in his left hand and raises a sword in his right hand. The figure facing him has one foot forward but details of the figure are difficult to make out. The photo to the right is from Harbison, 1992, Vol. 2, Fig. 46.
Because Goliath is still standing in this image, Harbison suggests that it represents David encountering Goliath, prior to smiting him with a stone. (Harbison, 1992, p. 21)
Castledermot, South, north 3

As noted above, under the heading of David Arms Himself, Harbison identifies all but the top image on the north side of this cross as relating to David and Goliath. In the photo to the right, from Harbison, 1992, Vol. 3, Fig. 733, the image under consideration now is the middle panel, the N 3.
In this image a very tall Goliath towers over a very small image of David. Goliath holds a sword above David’s head. As with the image above, because Goliath is shown standing, this must represent the moment when David confronts Goliath prior to striking him with a stone.
Donaghmore/Down North 2
The panel under consideration here is the second from the bottom in the photo to the left. The photo is from Harbison, 1992, Vol. 2, Fig. 188
In this panel we have the most basic of images, devoid, at least at this point in time, of any significant details. There are two figures facing each other. The figure on the right is as tall as the panel and holds a sword in front of him. The figure to the left is a head in height shorter than the figure on the right. Above his head is a round object. Harbison suggests the round object could be identified as the stone with which David will Slay Goliath. This figure is similar to that on the Castledermot cross described above with the exception that the figures here are depicted in profile while those on Castledermot are depicted frontally.
Harbison also notes that this panel had not previously been identified and makes his identification as a possibility. The comparison to the Castledermot panel gives support to this identification.
Killamery: End of North Arm, upper right
Roe interprets this panel as representing a combination of David Slays Goliath with David Slays a Lion. In this panel, illustrated to the right the entire scene must be considered at once. The illustration is from Roe, 1949, p. 49. Above, under the heading of David Slays the Lion we considered only the right hand portion of the scene. Now, identifying the human figure to the right as David Slaying the Lion is added the upside-down figure on the left. That this can be identified as Goliath stems from the fact that his left hand is raised to his head, where he was struck by David’s slingshot stone. That this scene would reflect Goliath downed by the stone is suggested by the fact that he is depicted upside down.


For a discussion of the background of identifying this scene, see the discussion under the Killamery Cross above under the topic of David Slays the Lion. For an explanation of Roe’s suggestion that the figure to the left is Goliath, see the discussion above on the Arboe cross under the topic of David Slays Goliath.
To summarise, Roe sees this scene as a repeat of a pattern shown in the illustration to the left above from the Irish Psalter in St. John’s College, Cambridge. The illustration, as noted above, is found in Roe, 1949, p. 50. In this example it is clear that the figure upside down is Goliath as he holds his hand to his head, the site of his injury. In the I Samuel text the boast of the slaying of the lion is related to King Saul and convinces him that David is up to challenging Goliath. While it is difficult to identify the figure Roe identifies as the lion as such, it is equally difficult to envision Salome dancing on her head for the head of John the Baptist.
Harbison completely disagrees with Roe’s identification. He identifies each of the scenes on the end of the North arm as relating to John the Baptist. Moving from top left clock-wise he suggests St. John the Baptist Embracing/Recognising Christ, Salome Dances for the Head of John the Baptist, Zacharias and Elizabeth with the Infant John the Baptist and the Naming of John the Baptist. The first two panels are the only ones I find an identification for from Roe. She identifies them as Jacob Wrestling with the Angel and, as noted above, a combination of David slaying the Lion and Goliath. (Harbison, 1992, p. 123) I can understand Harbison’s identifications of each of the panels with he exception of the one under consideration. While the body of the lion, if it is such, is not obvious, it is difficult to understand why Salome is depicted as dancing upside down. It is also difficult to reconcile the image with Salome rather than Goliath, given the similarities pointed out by Roe, as noted above.
Over all, I would tend to agree with Roe’s identification based on the similarities with the illustration from the Irish Psalter in St. John’s College, Cambridge.
Monasterboice, Muiredach’s east 2
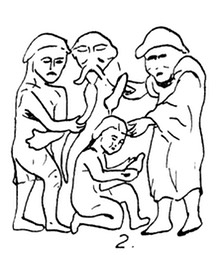
On this panel there is a composite image that progresses, almost like a cartoon, from left to right. On the left the figure of King Saul sits on a chair with his shield and sword held in his left hand. In his right hand he holds a drinking horn to his mouth. In front of him the figure of David stands moving away from Saul in the direction of Goliath. David holds his staff horizontally over his left shoulder and in his right hand his slingshot is visible. Over his shoulder his bag for stones is also visible. In front of David is the figure of Goliath. He is already on his knees and turned away from David. He holds a shield and sword in his right hand and appears to hold a left hand up to his face where he has been struck with David’s stone. To the left of Goliath and shown frontally is a figure with a shield and sword that can be identified as Goliath’s armour bearer, a figure that is mentioned in the I Samuel text.

The photo to the left was taken by the author. The illustration that Roe includes in her 1949 paper (Roe 1949, p. 48) shows some of the detail better than the photographs. In this illustration it is clear that Goliath has his left hand up to his face. Roe sees this illustration as showing a relatively full presentation of David Slays Goliath. However, three aspects of the full story are missing. First, we do not have David confronting Goliath before casting his stone. Secondly, we do not have David cutting off the head of Goliath. Third we do not have David carrying the head of Goliath to Jerusalem.
Roe and Harbison agree on the identification of this scene. Harbison titles it David Departs from Saul and Encounters/Smites Goliath. (Harbison, 1992, p. 140.
Ullard, east face, head, upper panel
This scene has been interpreted in three ways according to Harbison. Harbison identifies it with a (?) as representing David Encounters/Smites Goliath. He suggests the object between them is a sword and he also identifies the right hand figure as holding a round shield. He compares this to the panel on Castledermot, South Cross N 3 discussed above. Some have interpreted it as Saints Peter and Paul. This would be the Apostles Peter the Rock and Paul who carried the Gospel to the Gentiles. The scene has also been interpreted as the Slaughter of the Innocents. In this case the object between the two figures would be a child, in the process of being killed.
The image above left is a photo taken by the author of the Ullard signpost placed by the Irish Ministry for Arts Preservation. The photo to the right is from Harbison, 1992, Vol. 2, Fig. 648 detail.
In addition to the possible identifications above, the Irish Ministry for Arts Preservation, that prepared the sign post at the site (shown in part in the photo above to the left) identify it with a (?) as Paul and Anthony. These would be the two Desert Fathers who famously met in the desert and shared bread together. The bread was brought by a raven.
The identification of this scene hinges on the identification of the object that is between the two figures. If it represents David Encounters/Smites Goliath, the object would be a sword. If it represents Saints Peter and Paul, the object might be the keys to the Kingdom. If it represents the Slaughter of the Innocents, the object would be a child held up while being killed. If it represents Saints Paul and Anthony of the Desert, the object would be a raven, perhaps bearing a loaf of bread. Unfortunately the object is deteriorated enough that no clear identification can be made.
C. David Slays Goliath

Castledermot, south, north 2
Drumcliff, east 4
Castledermot, south, north 2
As noted above, under the heading of David Arms Himself, the large figure of Goliath appears to sit on the right with the smaller David on his leg. David holds a sword upright to the left and appears ready to behead Goliath.
The photo to the right is from Harbison, 1992, Vol. 3, Fig. 733. The image under consideration here is the N 2, the second panel from the bottom.
Roe does not include this image in her listing of David Slays Goliath.
Drumcliff, east 4
On this section of the shaft we see two figures standing above what appears to be a prancing lion. Both figures are facing to the right, one behind the other. The figure on the left appears to hold a sword or club. The figure on the right may hold a circular shield.
While some have identified this scene as the Sacrifice of Abraham, the iconography is not typical of this scene on the crosses. For example there is no altar.
Another suggestion is that the scene depicts Cain killing Abel. In context with the other images on this face of the cross this interpretation is possible. Below the prancing lion is an image of Adam and Eve eating the apple. Above the present scene is an image of Daniel in the Lion’s Den. Cain killing Abel would be consistent with these Old Testament images, as would David slays Goliath.
The photo to the left is from Harbison, 1992, Vol. 2, Fig. 218.
Harbison’s suggestion that this represents David Slaying Goliath also fits with the Old Testament theme of the East face of the cross. (Harbison, 1992, p. 71) It is possible that the prancing lion below the image under consideration is intended to represent the Lion of Judah. The lion was the symbol of the tribe of Judah. This title was derived from Genesis 49:9 where Jacob refers to his fourth son, Judah, as a young lion.
9 Judah is a lion's whelp; from the prey, my son, you have gone up. He crouches down, he stretches out like a lion, like a lioness—who dares rouse him up? (NRSV)
If there is a reference to Judah as a lion in the symbol of the prancing lion, that might support an identification of the scene above as David Slays Goliath rather than Cain kills Abel. Another detail of the carving, the apparent round shield that is carried by the figure on the right, would also seem to rule out an identification of the scene as Cain kills Abel. That the possible Goliath figure is turned away from David suggests a possible parallel with the scene described above on the Cross of Muiredach a Monasterboice. If the object in David’s hand is identified as a sword the image could represent David about to stab or behead Goliath.
D. David with the Head of Goliath
Donaghmore/Down, east 4 left
Killary, north 1
Monasterboice tall east 4 left
Seir Kieran, base east upper left
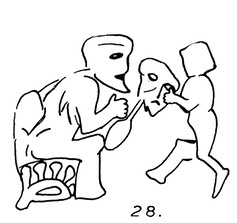
Donaghmore/Down, east 4 left
The illustration to the right appears above with respect to the portion of the carving on the right, David Slays a Lion. Here we focus on the left-hand side of the carving. The figure of David on the left is similar to, but smaller than the image on the right. Both have what appears to be wavy hair and a beard, at least a goatee. The figure on the left holds what appears to be a stick or pole in both hands. At the top is a head, understood to be the head of Goliath.
Taken together, the scene may proclaim that David, who boasted of killing a lion, was also successful, as he promised to King Saul, in killing the giant Goliath.
Roe and Harbison both agree on this identification.
The illustration to the right is from Roe, 1949, p. 46.

Killary, north 1
In this scene we have a single figure standing frontally. It appears that he holds an object in each hand. Harbison identifies the object in his left hand as a shield and the object in his right hand as a head held on a short curving stick. While the identification cannot be certain, mostly because of the deterioration of the panel, Harbison lists it among the possible depictions of David with the head of Goliath. (Harbison, 1992, p. 125) As we will see below, under the heading of David as Warrior, Roe interprets this image as fitting with that topic.
The photo to the right is from Harbison, 1992, Vol. 2, Fig. 416.
Monasterboice tall east 4 left
This panel contains images of two events in the life of David. That to the right has been discussed above under the heading of Samuel Anoints David. On the left-hand side of the panel a figure identified as David seems to stride toward the right holding the head of Goliath on a curved pole or stick. Roe suggests that the head of Goliath actually floats in the air while David’s slingshot hangs down. This is made unlikely as the item held in David’s right hand extends above his hand. This would not be likely if this was intended as a flexible slingshot. Harbison’s interpretation is to be preferred.
The photo above left was taken by the author. The illustration to the right is from Roe, 1949, p. 41.
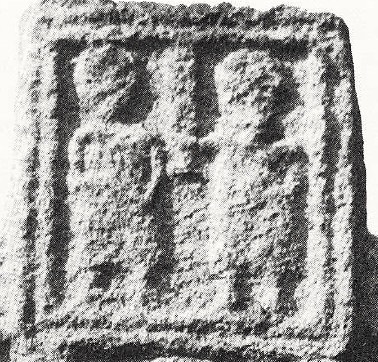
Seir Kieran, base east upper left
The details of this image are difficult to discern due to the deterioration of the carving. With assistance from the illustration to the right below it is possible to clearly identify the figure that may be David and that he is holding an object before him. See the upper left hand corner of the panel. Identifying the seated figure to the left is more difficult, but the chair can be discerned. Harbison offers the identification of the scene as a possible example of David bringing the head of Goliath to King Saul. He also suggests that it may represent the Summoning of David. In support of this second interpretation he points to panel S 3 at Kinnitty/Castlebernard that is nearby. (Harbison, 1992, p. 166) Roe is more certain of the identification of the image as representing David presenting the head of Goliath to Saul, suggesting that the sling is the object hanging down from the head of Goliath in the illustration.
The photo to the left is from Harbison, 1992, Vol. 2, Fig. 599. The illustration to the right is from Roe, 1949, p. 51.
Category Summary
On six of the panels described above there are two figures, that of David and that of Goliath. These panels are: Armagh S2, where Goliath is standing and holds a shield and sword and the image of David is worn enough to make details vague; Donaghmore/Down, N2, where Goliath stands and holds a sword; Ullard E head, where Goliath stands and holds a sword. These three images depict the encounter of David and Goliath, before David casts his stone and strikes Goliath in the head. We also have Arboe S3, where Goliath is on his knees holding his shield and sword and David is seen holding his slingshot; Castledermot S N3, where Goliath kneels and David holds a sword; and Drumcliff E4, where both figures stand, David holds a sword and Goliath has his shield. These three images depict the outcome of the encounter, Goliath stunned or slain by David’s stone. The basic iconographic elements for identifying a scene as connected to the David Slays Goliath series are depicted in these images.
In addition, there are four composite panels. These include Monasterboice, Muiredach E2 , where there is a scene that contains Saul seated on the left, David moving away from Saul with his staff and slingshot, Goliath on his knees and holding his head and Goliath’s armour bearer looking on. This composite fits well with those containing only David and Goliath. In addition there are three composite images that combine two events from the David Cycle. They are Donaghmore/Down E4 two where there are two images of David, one with a lion and one with Goliath’s head and Monasterboice Tall E4, where the anointing of David is combined with David holding the head of Goliath and Killamery where Roe and Harbison make very different identifications. Roe sees the figure of David Slaying the Lion with Goliath behind David and pictured upside down, suggesting he has been slain.
On two of the panels there is only one figure, that of David. These panels are: Castledermot S N4, where David holds a sword and Killary N1, where David is seen with a shield and the head of Goliath. In the case of the Castledermot S N4 panel the identification of the figure as David and the connection with the David and Goliath series is based solely on the context of the other panels on that side of the cross. There is one additional panel that contains two figures, that on Sier Kieran where the second figure is Saul and David is seen bringing the head of Goliath to Saul.
V. David as Harper/Musician
The Texts
And whenever the evil spirit from God came upon Saul, David took the lyre and played it with his hand, and Saul would be relieved and feel better, and the evil spirit would depart from him. I Samuel 16:23
I will sing a new song to you, O God; upon a ten-stringed harp I will play to you. Psalm 144:9
Harbison cites the first of these passages in relation to David playing for King Saul and calming the evil spirits that plagued him. Roe cites the second passage in general reference to David as a harper.
Introduction:
Roe points out that this is the motif in the David Cycle that appears most frequently on the Irish High Crosses. If all of there examples listed by Harbison and Roe are considered, there are thirteen examples. As will become obvious as we examine the various incidents of this image on the High Crosses, most of the images will contain only the image of David as a single harper. There are a few examples where David is accompanied by one or more additional musicians. Roe points out that the harp, as depicted on the crosses, is frequently a lyre rather than a harp. In addition, there are instances where the chair on which David sits or the harp itself appear to have zoomorphic elements. (Roe 1949, pp. 54-55)
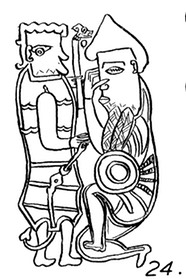
Roe identifies parallels to the David as Harper image in what she refers to as “antique art.” She points, as an example, to an image on a Roman lamp that has Orpheus sitting on a lion while holding his harp in his left hand and a tuning fork in his right hand. On the top of the harp is a bird. The top illustration to the right its from Roe, 1949, p. 58.
Arthur Kingsley, in his book The Crosses and Culture of Ireland, offers a different example of a parallel, this from the Durham Commentary of Cassiodorus on Psalms. The image shows David sitting alone playing the harp. It does not contain any zoomorphic elements. (Porter 1930 p. 91) Cassiodorus’ Commentary dates to the 8th century.
The illustration to the right is from http://www.betsillworkshop.com/lyre.htm, 2018.
The Crosses
Carndonagh, north pillar west face.Roe
Castledermot, North west face north arm Roe and Harbison
Castledermot, south west face, north armRoe and Harbison
Clonmacnois, Scripture, south 2Roe and Harbison
Durrow, east side of head, two figures playing Roe and Harbison
Graiguenamanagh, north, east 1Roe and Harbison
Kells, Market, south, head, lower panelRoe
Kells west/Broken east shaft 3Roe
Kells, Patrick & Columba, east topRoe and Harbison
KinnittyRoe
Monasterboice Muiredach’s, east head, musicians Roe and Harbison
Newtown, West face, north armHarbison
Ullard, east face, head, south armRoe and Harbison
Carndonagh, north pillar west face.
In discussing the Carndonagh cross, Harbison does not mention the pillars that flank the cross. They are obviously not part of the cross. They are included here because both Roe and Francoise Henry, author of Irish Art in the Early Christian Period (to 800 A.D., discuss them in connection with the cross and the iconography of David as harper.
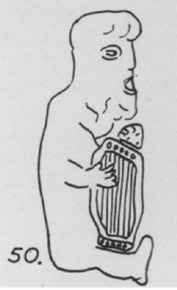
 The image here is not flattering. The entire body is out of proportion and the head is grotesque. In addition, David appears to be seated on the ground. Both Roe and Henry note that this may or may not represent David. The harp, which Henry describes as “barrel-shaped” is the key piece of iconography that suggests David as musician. (Henry, 1965, pp. 128-130) On the east face of this pillar is a carving described as David as Warrior. It will be discussed below. However, the possibility that one or the other represents David strengthens the probability that they both do.
Roe points out that in most of the examples of David as Harper the presumed harp is actually in the shape of a lyre. In the case of Carndonagh, Graiguenamanagh and the South cross at Kells, all of which are included in this survey, the image actually looks like a harp rather than a lyre. (Roe, 1949, p. 55)
The illustration to the right above is from Roe, 1949, p. 58. The photo to the left above was taken by the author.
Castledermot, North west face north arm
In this example of David as Harper David is shown alone. He is sitting on a chair holding his harp in an unusual position to be actually playing it. It is suspended in the air. Roe notes that the harp appears to have five or six strings. With some arching on the side of the harp near David’s body, the harp is largely a quadrangle.
The photo to the left was taken by the author while the illustration to the right is from Roe, 1949, p. 58.
Castledermot, south west face, north arm

The image on the South Cross has the same general appearance as that on the North Cross. David seems to sit up straighter and the harp rests on his upper legs. The harp is proportionately larger and in the illustration to the right appears to have four strings. Roe notes that there is a possible zoomorphic element on the top of the harp. (Roe, 1949, p. 57) In the illustration to the right this appears to be a serpent. In this image, David has his face turned toward the viewer.
The photo to the left was taken by the author. The illustration to the right is from Roe, 1949, p. 58.
Clonmacnois, Scripture, south 2
This carving of David as Harper has David seated on what appears to be an animal, perhaps a lion. He holds his harp on his knees. The harp has become bell-shaped to the extent that Kenneth MacGowan, author of Clonmacnois, who does not identify the figure as David, suggests the figure holds either a harp or a bell. (MacGowan, p. 42)
While both Roe and Harbison agree that this is an image of David as Harpist, Harbison notes that there have been other identifications including Moses striking the rock, the Raising of Lazarus, and the Virgin and child. Porter, for example, suggests that the figure is that of Saint Patrick banishing snakes from Ireland. He has Patrick sitting on a rock that has a snake coiling around it. (Porter, p. 31) None of these additional suggestions seem to fit with the iconography.
The photo left was taken by the author. The illustration to the right is from Roe, 1949, p. 56.
Durrow, east side of head, two figures playing
Roe and Harbison differ on their interpretation of the scene shown in the photo above left that was taken by the author and the illustration above from Roe, 1949 p. 56. Roe sees them as a unit that expresses David and his musicians. More will be said about this related to the Monasterboice cross discussed below. (Roe, 1949, p. 55) Harbison sees the pipe player as related to the image in the center of the head of the cross, which he identifies provisionally as The Last Judgment. He interprets the piper as an angel that parallels another angel on the right of the central scene standing with folded hands. Viewed carefully, the two figures that flank the Christ figure may well be depicted with wings. As described above under the heading of David Slays the Lion, the image on the right-hand arm is taken to represent David slaying a lion with the sheep in the constriction of the arm looking back at the scene. While Roe’s interpretation is appealing, the identification of the piper as related to David as Harper leaves the figure to the right of Christ in the Last Judgment or the Majestas Domini or Christ in Glory without any apparent identification related to the entire scene. (Harbison, 1992, pp. 79-80) Porter suggests the angel to the right of Christ is in an posture of adoration. (Porter, p. 74) Harbison’s identification of David as a solo harper is to be preferred.
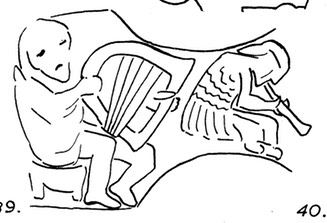
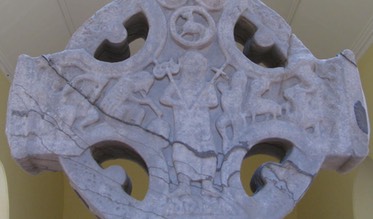
Another element in the full scene is the presence of a round object just under the end of the piper’s pipe. This has been identified as a head, but the significance of this is not addressed. As it does not likely relate to the image of David as Harper I will not venture any interpretation either.
Graiguenamanagh, north, east 1
This partly broken panel sits just above the base. On the left is the figure of David, apparently seated on the ground. His harp is in front of him and his right hand reaches across it, appearing to play the harp.
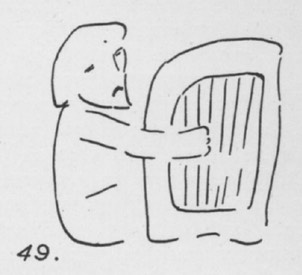
The photo to the left above was taken by the author, that to the right is from Roe, 1949, p. 58.
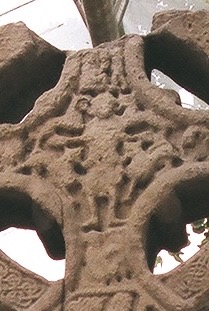
Kells, Market, south, head, lower panel
On the head of what Harbison refers to as the south face of the Market Cross, the centre of the head contains an image of Daniel in the Lion’s Den. Just below the feet of Daniel, in the contraction of the arm, is a small figure of a harper. The figure, presumably David, sits on the left facing a harp. Details are difficult to make out, but it appears that David sits on a chair. Roe does not include this image in her listing of images of David as Harper, preferring to interpret it as Samuel anointing David.
The photo to the right was taken by the author.
Kells west east shaft 3
Roe and Harbison agree that there are two scenes on this panel. They differ on the identification of each of the images. Roe identifies the figure to the left as David playing his harp while seated on a lion chair. As seen in the illustration to the right above, the David figure does seem to be seated. If the object below him is a chair with zoomorphic elements, he is perched above it more than seated on it. In his hands he holds a harp. His right hand can be seen as playing the harp. (Roe, 1988, p. 49) Roe does not venture an identification of the right portion of the panel.
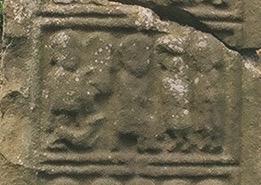
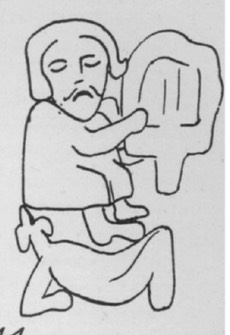
The photo above left was taken by the author, the illustration to the right is from Roe, 1949, p. 58.
Harbison offers two possible interpretations of this portion of the panel. He suggests it could represent the Raising of Lazarus from the Dead. See John 11:38-44. In this case what Roe identifies as a harp could be seen as the mouth of the tomb. The figure below Jesus could be identified as one of the Maries bowing before Jesus imploring him to raise Lazarus. A second possibility Harbison identifies is that the scene could represent Jesus healing the man at the Pool of Bethesda. See John 5:1-15. In this case the image before Jesus could be the man taking up his bed and walking. The figure below could be taken for the angel who troubled the waters.
Harbison also offers two possibilities for the identification of the right-hand portion of the panel. Without going into detail he suggests it could represent Jesus Delivers the Adulteress or The Woman of Samaria at the Well. (Harbison 1992, pp. 101-102.
While it is uncertain what either of the images on this panel represent, preference could be given to the suggestions made by Harbison because the other panels on this face of the cross so clearly represent scenes from the life and ministry of Jesus.
Kells, Patrick & Columba Cross: east top
On the left is a figure seated and holding a harp on his lap. This figure may be David playing his harp. Opposite is another figure seated with hands outstretched. This may represent King Saul. The scene could, therefore represent David playing before Saul. The heads above the two may, in this case, represent those in the court observing the scene. Harbison also notes that “the coil behind Saul’s ear may perhaps be the evil spirit which David was driving out.” (Harbison, 1992, p. 109)

Harbison notes conflicting interpretations of this scene. There are elements in this scene that could reflect the Multiplication of the Loaves and Fish. In the contraction of the arm are two crossed fish. The many circular figures above the two figures seated facing each other could represent the crowd. However, the two figures seated facing each other do not fit with the image of the Feeding of the Four, or Five Thousand.
As noted in the illustration above right, Roe focuses attention on the figure of David alone and does not offer any interpretation of the scene as a whole. (Roe, 1949, p. 55) Nevertheless, the identifications offered by Roe and Harbison, David as Harper or David Plays before Saul, are certainly possible.
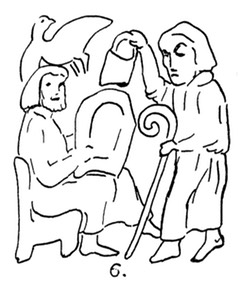
The photo to the left above was taken by the author, the illustration to the right is from Roe, 1949, p. 58.
Kinnitty
This image has been discussed under the heading of Samuel Anoints David above. It is included here only because Roe includes it as an image of a figure identified as David seated on a chair and playing a harp. The illustration is from Roe, 1949, p. 41.
Monasterboice south east head, group of musicians
Roe cites this image as the only example on the Irish High Crosses that shows David with his musicians. Several musicians appear to the left of the figure of the Christ in the Last Judgment scene. In the full image there are figures moving toward Christ from his right, identified as the saved. To the left of Christ there is a devil figure driving the damned away from Christ. However, just to the left of the devil figure there is a musician facing Christ and playing a flute. To the left of Christ there is a seated figure playing a harp. This is presumably David. Behind him, in the contraction of the arm there are several other musicians. Harbison points out that there is a bird on the top of David’s harp that faces David and may be seen as whispering in his ear. This bird almost certainly represents the Holy Spirit. (Harbison, 1992, pp. 141-142)
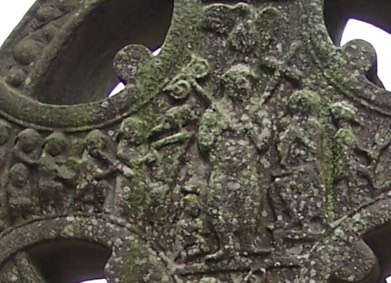
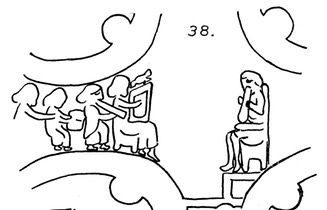
The illustration above to the left is from Roe, 1949, p. 56. The photo to the right was taken by the author.
Newtown, East face, south arm
The image on the Newtown cross is impossible to identify from the photograph to the left.
The photograph to the right is from Harbison, 1992, Vol. 2, Fig. 525.
Ullard, east face, head, south arm
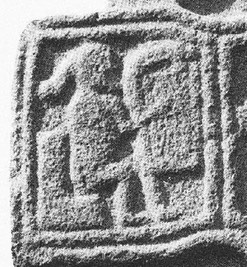
This image has David sitting on a chair with a large harp in front of him. His right arm appears to be playing the harp. He is depicted with long flowing hair.
The photo to the left is from Harbison, 1992, Vol. 2, Fig. 642.
Category Summary
The iconographic keys to this image are the presence of a seated figure holding a harp. In the vast majority of the cases the figure is depicted alone on the panel. The most notable exception is that on the east head of the Muiredach cross at Monasterboice where David is joined by other musicians. In this image a bird appears on the top of the harp, a probable symbol of the Holy Spirit. Another exception is the image on the Patrick and Columba cross at Kells where, on the top of the east face two figures face each other, both seated on chairs. Around them are the heads of numerous other figures. This image could be taken to represent David playing before Saul. The east face of the Durrow cross, on the head definitely has an image of David as Harper but, depending on the interpretation of the central scene, many also include an additional musician. On the Kells west cross and the Kinnitty cross the image of David as Harper is in a composite image representing two events. On the Kells west cross the identification of the other part of the panel is problematic while on the Kinnitty cross the image is combined with the anointing of David by Samuel.
VI. David as Shepherd
The Text
In I Samuel 16 and 17 David is identified as tending the sheep of his father Jesse. Below are two examples.
Samuel said to Jesse, "Are all your sons here?" And he said, "There remains yet the youngest, but he is keeping the sheep." And Samuel said to Jesse, "Send and bring him; for we will not sit down until he comes here." I Samuel 16:11
14 David was the youngest; the three eldest followed Saul, 15 but David went back and forth from Saul to feed his father's sheep at Bethlehem. I Samuel 17:14-15
Theologically the use of the image of David as shepherd offers a prototype of Jesus as the Good Shepherd. See for example John 10:11 where Jesus is quoted as saying "I am the good shepherd. The good shepherd lays down his life for the sheep.
The Crosses
Clonmacnois, Scripture, south 3
Durrow, cross-head, east face
Roe does not include a category of David as Shepherd in her article on The David Cycle.
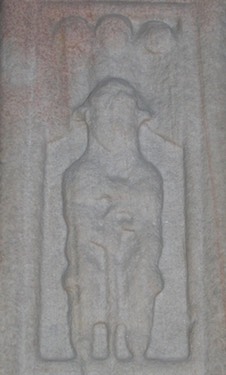
Clonmacnois, Scripture, south 3
In this image the figure of David stands frontally holding his shepherd’s crook in front of him. Above his head is the figure of an angel. This image has also been interpreted as St. Patrick and his angel Victor and St. John the Evangelist with the eagle symbol for that evangelist. This image has also been interpreted as “a bishop wearing a mitre, with a crozier and an angel overhead.” (MacGowan, p. 42) The fact that the image below this panel depicts David playing his lyre suggests that Harbison’s identification as noted above is probably correct, though he lists it with a “?”.
The photo to the right was taken by the author.
Durrow, fragmentary cross-head, east face
This cross-head is on display in the National Museum of History and Archaeology in Dublin. In the center of the head of the cross is a figure standing frontally. In his left hand he holds a crook. See the image to the right below.
Harbison compares this image with one on the Tall Cross at Monasterboice where David is accompanied by an angel. He writes: “As the figure on the east face of the fragmentary cross-head at Durrow bears a similar staff, and may be surmounted by an angel, and as it perhaps bears a lamb on its left shoulder, it is also taken to represent David As Shepherd.” (Harbison, 1992, p. 214)
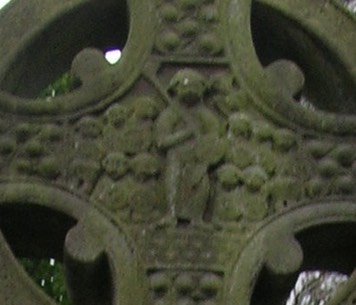
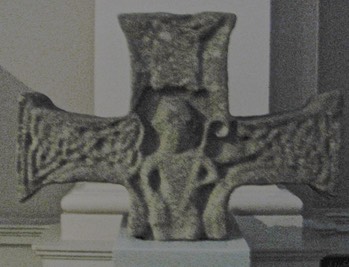
Both of the photos above were taken by the author.
To the left above is the image of David Acclaimed King of Israel that Harbison is referring to. This image will be discussed below under the heading David as Warrior. To be noted here is the presence of an angel just above David’s left shoulder. I can identify no such image on the fragmentary cross-head pictured above right. The figure Harbison suggests may be a sheep extends into the right arm and has too little detail to clearly identify as a sheep or lamb.
Category Summary
Both of the images identified as David as Shepherd have one identifying feature. In each a central figure is depicted with a shepherd’s crook. While there may be an angel in the Durrow image, as suggested by Harbison, there is clearly an angel above the figure on the Clonmacnoise Scripture cross.
VII. David as Warrior
The Crosses
Carndonagh north pillar, east side
Durrow south shaft 3
Killary north 2
Kells, Market, south 2
Monasterboice, tall, east, centre of head
Monasterboice West north 2
Tynan, village, shaft, west face
Carndonagh north pillar, east side
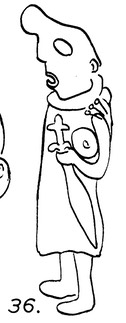
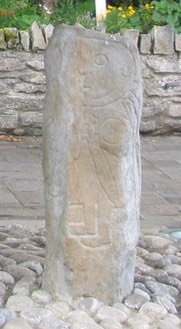
This image is not considered by Harbison because it is not located on the actual cross at Carndonagh. Henry describes the figure as having “an enormous round eye and broad feet, clutching a diminutive round shield and a sword.” (Henry 1965, pp. 128-130)
Roe offers an illustration of the scene on the north pillar. Her description of the image is minimal.
The photo to the right was taken by the author, the illustration to the left is from Roe, 1949, p. 54.
Durrow south shaft 3
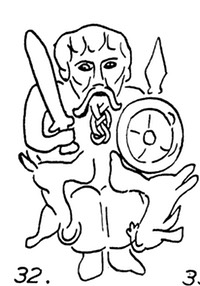
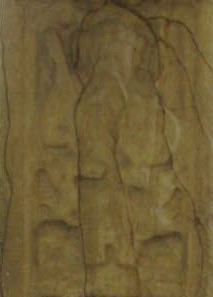
In this image, the central figure identified as David appears to be seated. In his left hand is a shield, above which the head of a spear appears to protrude. In his right hand is a sword held upright. On each side, appearing to bend backward over his knees are images of what Roe identifies as dogs and Harbison identifies simply as animals.
Roe identifies this image as David the Warrior while Harbison identifies it as David as King. (Roe, 1949, p. 52 and Harbison, 1992, p. 80) Either interpretation can be seen as appropriate. David the King was also David the Warrior King.
The illustration to the left is from Roe, 1949, p. 53 and the photograph to the right was taken by the author.
Killary north 1 and 3
The illustration below right, from Roe, depicts N1 on the Killary cross. This image was discussed above under the heading of David with the head of Goliath, the identification given it by Harbison. What Roe sees in this image is David standing frontally holding a shield in his left hand and an orb in his right hand. This interpretation will occur again below with respect to the image on the Tall Cross of Monasterboice N2.
The images to the left below are from Harbison, 1992, Vol. 2, Fig. 417, Killary N3 above and Killary N1 below. The illustration below right is from Roe 1949, p. 54, Killary N1.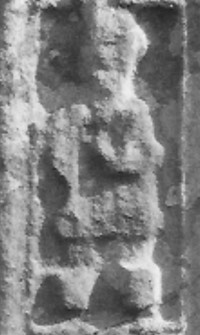
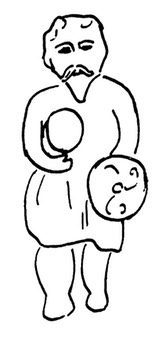
Where Harbison sees the object in the right hand of David as the head of Goliath, Roe sees the same object as an orb. She writes: “This object as been interpreted as an orb and also thought to be food for the dogs. On comparison with some English manuscripts we find that this round object also appears, as for example in the Durham Cassiodorus where in the miniature of David as warrior it is used as an ‘identity disc’ with the name David inscribed on it. This whole group of designs appears to derive ultimately from the ivory consular diptychs of the 5th and 6th centuries.” She offers as another example a “leaf of the diptych of Flavious Anastasius, Consul at Constantinople in A.D. 517. The consul is shown seated on an elaborate state chair with ‘lion’ supports and holding on high the ‘mappa Circenbsis’ which he would throw down as a signal for the public games to begin.” (Roe 1949, quote and illustration to the right below pp. 53-54).
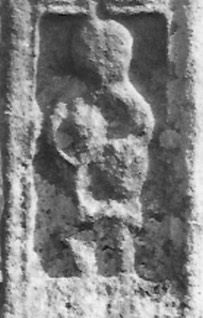
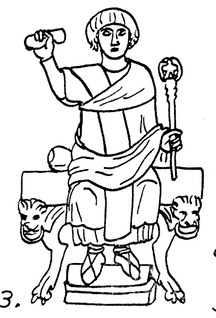
Harbison also finds an image of David on the Killary cross, North 3, the photo above left. He describes the image as a possible example of David, without reference to David as Warrior or King. The figure is depicted frontally and seems to have the right hand down by his side while the left hand holds something that Harbison does not identify but that could be a shield. Harbison points out that the blocks that appear in the place of feet could be an unfinished part of the carving. (Harbison, 1992, p. 125)
Roe does not seem to offer an identification for the N3 panel. If she saw it as another image of David as warrior or king, she would place two images with similar identifications on the same side of the cross. This alone would suggest that Harbison’s identification of the N1 as David with the head of Goliath is to be preferred.
Kells, Market, south 2
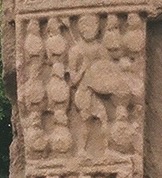
This image is dominated by the figure of a tall man armed with shield and spear or lance. His feet touch the bottom of the panel and his head touches the top. On his right there are six figures, in three ranks, each armed with a shield. On his left there are additional men armed with shields, again in three ranks.
Harbison identifies this as a possible image of David Acclaimed King of Israel. In this case, David is the central figure. Harbison notes that a number of other interpretations have been offered of this scene including Finn and the Fianna, Goliath with the Israelite army, the Harrowing of Hell and Christ as King of Glory. The later identification is that favoured by Roe.
Roe, in her book The High Crosses of Kells compares this image, which she identifies as Christ as King of Glory, with that on the Tall or West Cross at Monasterboice at the center of the East face. (Roe, 1988, p. 30) Suffice it here to note the very different interpretations of that image.
The differences between the interpretations of Harbison and Roe may be explained, in part, by the presence in panel E2 of a scene that is clearly Christ in the Tomb, while most of the other images on this face of the cross refer to scenes from the Hebrew scriptures. E2 could be seen as transitional, representing either the Christian or Hebrew scriptures. It seems likely to me that Harbison is correct in his interpretation of the scene here and on the Tall or West Cross at Monasterboice that will be considered next.
Monasterboice, tall, east, centre of head
In this image a large central figure stands frontally. In his left hand he holds a shield and sword. In his right hand he holds a staff over his right shoulder that Harbison suggests is topped by an animal of some sort. (Harbison, 1992, p. 148) On each side of this central figure are five additional armed figures. Each holds a shield. Above the left shoulder of the central figure is an angel.
Harbison identifies this image as David Acclaimed King of Israel. This identification fits with the identifications of most of the other panels on this face of the cross. Harbison sees all but two of the panels as representing scenes from the Hebrew scriptures. The exceptions are a scene on the south arm that he identifies as the Temptation of St. Anthony; and the upper panel on the head that he identifies as Christ Walks Upon the Water.
As noted above with respect to the scene on the Kells Market Cross, Roe identifies this scene as The Second Coming of Christ to Judgment or the King of Glory and the Lord of Hosts. She notes that this identification is without parallel in Ireland. This in itself might tend to support the identification made by Harbison.
Monasterboice West north 2
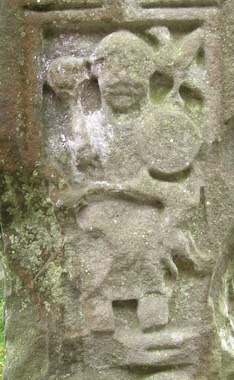
In this scene we have a parallel to that on the Durrow cross S3, described above. A regal figure, identified as David, is seated, facing frontally. In his left hand he holds a shield and in his right hand he holds up an orb. On the left shoulder of David sits a bird. As in some of the images of the anointing of David, this bird may represent the Holy Spirit. Across the knees of David, with their backs to his calves and their heads meeting across his lap, are two dogs. The significance of the orb and the dogs is discussed above related to Durrow S3. Roe sees it as paralleled by an image of Flavious Anastasius.
Both Roe and Harbison agree on the identification of this carving.
The photo to the left was taken by the author.
Tynan, village, shaft, west face
The images on this panel are difficult to discern. There is clearly a large figure standing frontally in the center of the panel. The images around the central figure are less easily identified. Harbison suggests they represent those who are proclaiming David King of Israel. He points out a figure just to the left of David that appears to hold a sword that points toward the upper left corner of the panel. This scene is compared to that on the Kells Market cross S2 and the Tall Cross at Monasterboice, center of the head on the east face, both discussed above, as comparisons. (Harbison, 1992, p. 181)
The photo to the right is from Harbison, 1992, Vol. 2, Fig. 637.
Category Summary
In this category I have combined two types of images, as identified by Harbison, that of David as Warrior and David acclaimed King. Of the seven images considered above, including only the N3 panel at Killary, Harbison identifies five of them as depicting David Proclaimed King of Israel. There appear to be two different criteria for these identifications. In two cases, Durrow S3 and Monasterboice Muiredach’s, center of east head, David is shown alone, frontally, seated , holding a shield, sword and spear and accompanied by two animals, one on each side bent over his knees. In addition, at Monasterboice Muiredach’s, there is a bird on his left shoulder. Thus, in these two cases, David is enthroned. In the other three cases, on Kells Market Cross S2, Monasterboice Tall, center of east head, and Tynan Village west face, David is surrounded by a group of other warriors. These images are less convincing as David acclaimed King and could just as easily, as Roe suggests, represent David as Warrior. Because Harbison does not include the cross pillar at Carndonagh, the only image he defines as David as Warrior is that at Killary, the N3 panel. In this panel David is a lone figure shown frontally and holding a shield. Because of damage to the panel, it is unclear but possible that he also holds a sword.
Roe identifies all seven of the images described above, including Killary N1 and excluding Killary N3, as related to David as Warrior. As noted above, the distinction is arguable as David the King was also David the Warrior King. On two of the crosses, as noted above, the figure of David is seated. In every case he is armed. On five panels he is standing. On three of the panels David is surrounded by other warriors and on four panels he is depicted alone.
Conclusion
My purpose in this study has been to identify, describe and evaluate the scenes on the Irish High Crosses that either Harbison or Roe has identified as bearing an image related to the David Cycle. For several reasons Roe’s list and Harbison’s list are different. Harbison identifies 48 images related to the David Cycle while Roe identifies only 39. In some cases the two disagree on the identification of the panels but in addition, each includes images not included by the other. Roe includes seven images that are either not included by Harbison or identified by Harbison as non David Cycle related. Harbison includes about seventeen images that are not included by Roe or that Harbison interprets differently than Roe. That not all the panels can be easily identified is made clear in that Harbison lists seventeen of his 48 identifications with a “?”. Roe likewise makes a number of tentative identification of scenes that are too worn or damaged to make clear identifications based on iconographic features.
In a number of cases there are significant differences in the interpretation of of particular scenes. This occurs in at least five cases. In two of the instances I prefer the identification of Roe while in the other three I prefer Harbison’s identification 1) Where Harbison identifies the Kells Market Cross South 3 as Samuel Anoints David, Roe identifies it as a Christian Scripture Image, Jesus Heals the Blind Man. In this case, both identifications are questionable but I tend to support Roe’s Christian Scripture identification. 2) Where Harbison identifies the image on the head of the Kells Market Cross just below the central image of Daniel in the Lion’s Den as David Playing the Harp, Roe sees this as A David Cycle scene but identifies it as Samuel Anointing David. In this case I much prefer Harbison’s identification. 3) In the case of the image on the Killamery Cross the North side, the end of the arm, the upper right of four small panels, Roe identifies this as a composite of David Slays the Lion and David Slays Goliath, while Harbison sees it as a Christian Scripture image of Salome Dancing for the Head of John the Baptist. In this instance I prefer Roe’s identification. 4) Harbison and Roe also differ on the identification of the scene on the Kells Market Cross, South 2. While Harbison identifies this scene as David Acclaimed King of Israel, Roe sees it as a Christian Scripture image of Christ as King of Glory. In this case I tend to prefer Harbison’s identification. 5) A similar difference occurs in their identification of the scene on the Monasterboice Tall Cross, East face, center of the head. While Harbison identifies this scene as David Acclaimed King of Israel, Roe gives it a Christian Scripture identification of either the Second Coming of Christ to Judgment or the King of Glory and the Lord of Hosts. As with the scene above, I tend to prefer Harbison’s identification.
Resources Cited
Henry, Françoise; Irish Art in the Early Christian Period (to 800 A.D.), Methuen & Co. LTD, London, 1965.
Harbison, Peter; "The High Crosses of Ireland: An Iconographical and Photographic Survey", Dr. Rudolf Habelt GMBH, Bonn, 1992. Volume 1: Text, Volume 2: Photographic Survey; Volume 3: Illustrations of Comparative Iconography.
MacGowan, Kenneth, Clonmacnois, KAMAC Publications, Dublin, 1998.
Mauchline, John, 1 and 2 Samuel, New Century Bible, Marshall, Morgan and Scott Ltd., 1971.
Metropolitan Museum: https://www.metmuseum.org/art/collection/search/464375
Metropolitan Museum: https://www.metmuseum.org/art/collection/search/464377
New Revised Standard Version of the Bible, https://www.biblestudytools.com/nrs/
Porter, Authur Kingsley, The Crosses and Culture of Ireland, New Haven, Yale University Press, 1931.
Reames, Sherry L. (Ed.), “Legends of St. Anne, Mother of the Virgin Mary: Introduction”, Middle English Legends of Women Saints, 2003. http://d.lib.rochester.edu/teams/text/reames-middle-english-legends-of-women-saints-legends-of-st-anne-mother-of-the-virgin-mary-introduction.
Roe, Helen M., The “David Cycle” in Early Irish Art, The Journal of the Royal Society of Antiquaries of Ireland, Vol. 79, No. 1/2, Centenary Volume (1949), pp. 39-59
Roe, Helen M., The High Crosses of Kells, Meath Archaeological and Historical Society, 1988.